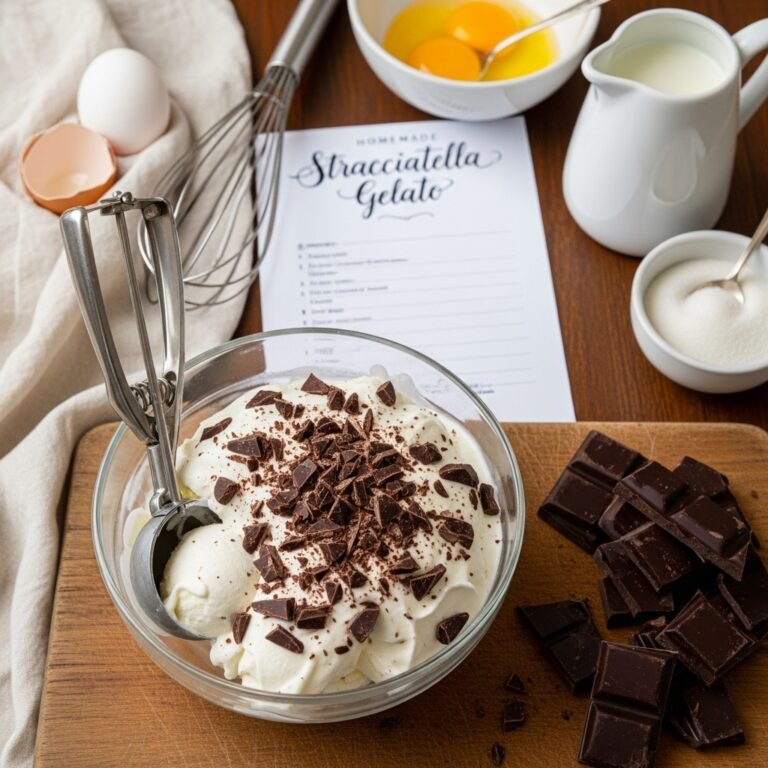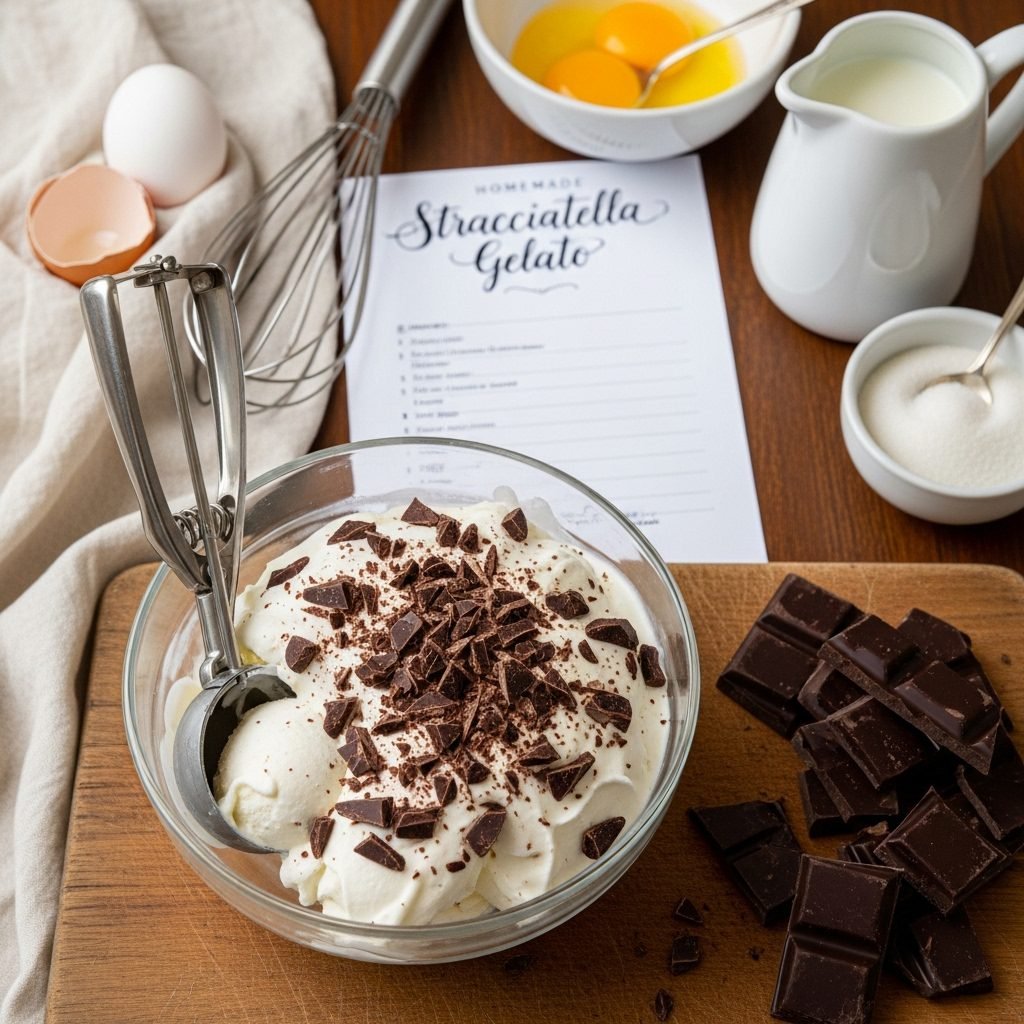
Homemade Stracciatella Gelato Recipe – Authentic Italian Chocolate Chip Gelato
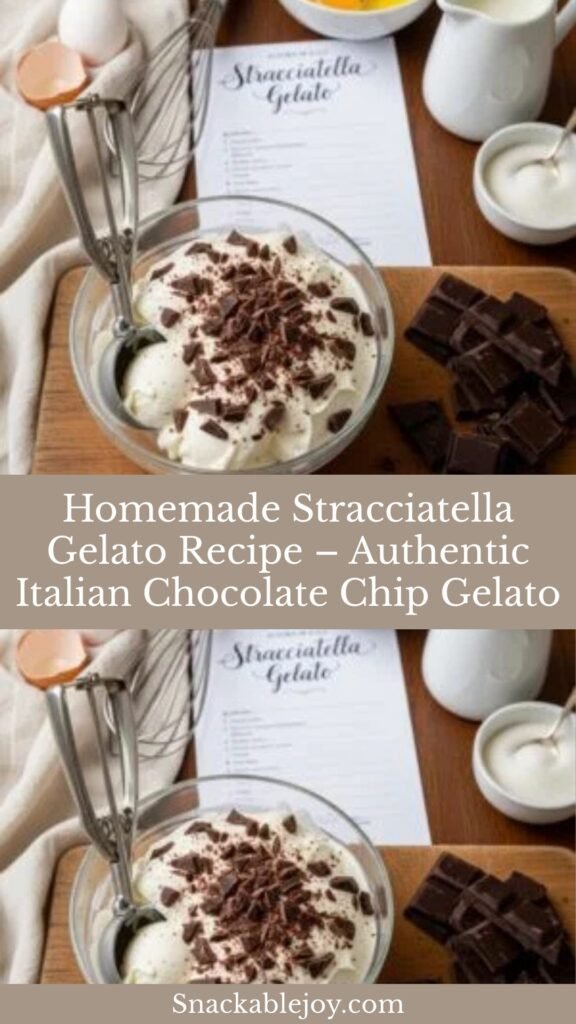
If you’ve ever wandered through the cobblestone streets of Italy and stopped at a gelato shop, chances are you’ve encountered stracciatella gelato—that dreamy, creamy vanilla gelato studded with delicate ribbons of dark chocolate. This isn’t your average chocolate chip ice cream. Stracciatella (pronounced strah-chah-TELL-ah) is a sophisticated Italian frozen dessert where warm melted chocolate is drizzled into cold gelato base while churning, creating those signature irregular chocolate shards and delicate wisps that melt on your tongue.
This homemade stracciatella gelato recipe brings authentic Italian gelato-making right into your kitchen. It’s perfect for summer gatherings, dinner party finales, romantic date nights at home, or simply treating yourself to something special on a lazy Sunday afternoon. Unlike American ice cream which relies heavily on cream, authentic gelato has a higher proportion of milk, making it silkier, denser, and surprisingly lighter-tasting despite its luxurious texture. The chocolate doesn’t overpower—it whispers elegantly alongside the sweet vanilla base.
Whether you’re a gelato enthusiast, an Italian food lover, or simply someone who appreciates the finer things in frozen desserts, this recipe will transform your kitchen into a Roman gelateria. And the best part? You’ll know exactly what’s going into your gelato—no stabilizers, no artificial flavors, just pure, wholesome ingredients.
History / Background
Stracciatella gelato has a charming origin story that dates back to 1961 in Bergamo, a beautiful city in the Lombardy region of northern Italy. The credit goes to Enrico Panattoni, owner of the Restaurant La Marianna, who was inspired by stracciatella soup—a classic Roman egg drop soup where beaten eggs are drizzled into hot broth, creating delicate ribbons.
Panattoni wondered: what if he applied this technique to gelato? He experimented by drizzling melted chocolate into freshly churned vanilla gelato, and the result was magical. The warm chocolate hit the cold gelato base and immediately hardened into thin, irregular shards—crispy yet delicate, creating textural contrast that was revolutionary for its time. The name “stracciatella” comes from the Italian word “stracciare,” meaning “to shred” or “to tear,” perfectly describing those beautiful chocolate ribbons.
The gelato became an instant sensation and quickly spread throughout Italy, eventually becoming one of the country’s most beloved gelato flavors alongside classics like pistachio and nocciola (hazelnut). Today, you’ll find stracciatella in virtually every gelateria across Italy, from Milan to Sicily.
What makes stracciatella particularly special in Italian culinary culture is its simplicity. It’s not about complex flavor combinations or trendy ingredients—it’s about perfecting the basics: exceptional vanilla, quality chocolate, and masterful technique. This philosophy embodies the Italian approach to cooking: fewer ingredients, but better quality, executed with care and respect for tradition.
Why You’ll Love This Recipe
Making stracciatella gelato at home is one of those truly rewarding kitchen projects that seems impressive but is actually quite achievable with the right guidance. There’s something deeply satisfying about creating a dessert that rivals (or exceeds!) what you’d find in the finest gelaterias, all from the comfort of your own kitchen.
Here’s why this recipe will become your new favorite frozen dessert:
- Authentically Italian – This isn’t American-style ice cream; it’s real gelato with the proper milk-to-cream ratio and traditional churning technique
- Incredible Texture – Denser and silkier than ice cream, with those signature chocolate shards that provide delightful crunch
- Customizable Sweetness – Control your sugar levels and chocolate intensity to suit your preferences
- Impressive Yet Achievable – Looks and tastes gourmet, but the process is straightforward with proper instructions
- No Artificial Ingredients – You know exactly what’s in your gelato—pure, wholesome ingredients you can pronounce
- Perfect for Entertaining – Serve it at dinner parties and watch your guests’ faces light up
- Budget-Friendly Luxury – Create restaurant-quality gelato for a fraction of what you’d pay at specialty shops
- Fun Technique – The chocolate drizzling step is genuinely enjoyable and almost meditative
- Make-Ahead Friendly – Prepare in advance for stress-free entertaining
- Crowd-Pleasing Flavor – Universally loved; even picky eaters adore this elegant yet familiar taste
Ingredient Notes
Let’s break down each ingredient and understand why it matters for creating authentic stracciatella gelato:
Whole Milk: The foundation of gelato. Unlike American ice cream which uses mostly heavy cream, authentic Italian gelato has a higher milk content (usually 60-70%). This creates that signature dense yet smooth texture. Use whole milk (3.25% fat) for best results. Substitution: You can use 2% milk, but the gelato will be slightly less creamy.
Heavy Cream: Provides richness and helps create smooth texture by preventing large ice crystals. Use cream with at least 36% fat content. Substitution: Half-and-half can work in a pinch, though texture will be lighter.
Granulated Sugar: Sweetens the base and lowers the freezing point, keeping gelato scoopable. The amount here creates a balanced sweetness that lets the vanilla shine. Substitution: Superfine sugar dissolves faster; avoid artificial sweeteners as they affect freezing.
Egg Yolks: Create the custard base that gives gelato its luxurious, velvety mouthfeel. They act as natural emulsifiers, binding fat and water molecules. Use fresh, large eggs at room temperature. Substitution: None recommended—yolks are essential for authentic gelato texture.
Vanilla Bean Paste or Pure Vanilla Extract: Vanilla is the star here, so quality matters immensely. Vanilla bean paste gives you those gorgeous specks and intense flavor. Substitution: One vanilla bean (scraped) equals about 1 tablespoon paste; pure extract works but use a generous amount.
High-Quality Dark Chocolate: This is where stracciatella magic happens. Use chocolate with 60-70% cacao content—it should be good enough to eat on its own. The chocolate needs to melt smoothly and harden quickly when hitting cold gelato. Substitution: Semi-sweet chocolate chips work but aren’t traditional; avoid milk chocolate as it’s too sweet.
Pinch of Salt: Enhances all the other flavors and balances sweetness. Don’t skip it!
Equipment Needed
Having the right tools makes gelato-making significantly easier and ensures professional results:
- Ice Cream Maker/Gelato Machine – Essential for proper churning; models with built-in freezers work best, but freezer-bowl types work too
- Medium Heavy-Bottomed Saucepan – For making the custard base without scorching
- Heatproof Mixing Bowl – For tempering eggs and cooling the base
- Wire Whisk – For whisking eggs and custard
- Fine-Mesh Strainer – Removes any cooked egg bits for silky-smooth gelato
- Candy/Digital Thermometer – Essential for monitoring custard temperature (170-175°F is the target)
- Wooden Spoon or Silicone Spatula – For stirring custard continuously
- Small Microwave-Safe Bowl – For melting chocolate
- Fork or Small Whisk – For drizzling chocolate into churning gelato
- Freezer-Safe Container with Lid – A loaf pan or shallow container (gelato freezes best in shallow layers)
- Measuring Cups and Spoons – For precise ingredient amounts
- Large Bowl of Ice Water – For quickly cooling the custard base
Print

Stracciatella Gelato Recipe
Authentic Italian stracciatella gelato with a silky vanilla custard base and delicate ribbons of dark chocolate. This homemade version rivals the best gelaterias in Italy, with rich flavor, creamy texture, and those signature chocolate shards that make stracciatella so special.
- Total Time: 5 hours 5 minutes
- Yield: 6-8 servings (about 1 quart) 1x
Ingredients
ScaleFor the Gelato Base:
- 2 cups whole milk
- 1 cup heavy cream
- ¾ cup granulated sugar
- 5 large egg yolks
- 1 tablespoon vanilla bean paste (or 2 teaspoons pure vanilla extract)
- ⅛ teaspoon salt
For the Stracciatella:
- 5 ounces high-quality dark chocolate (60-70% cacao), finely chopped
- 1 teaspoon coconut oil or neutral oil (helps chocolate stay crispy)
Instructions
Step 1: Prepare the Custard Base
In a medium heavy-bottomed saucepan, combine whole milk, heavy cream, and half the sugar (about 6 tablespoons). Heat over medium heat, stirring occasionally, until the mixture reaches 170°F and is steaming but not boiling. Remove from heat.Step 2: Temper the Egg Yolks
In a heatproof mixing bowl, whisk together egg yolks, remaining sugar, and salt until pale and slightly thickened, about 2 minutes. While whisking constantly, slowly drizzle about 1 cup of the hot milk mixture into the yolks (add it very gradually to prevent scrambling). This is called tempering.Step 3: Cook the Custard
Pour the tempered egg mixture back into the saucepan with the remaining milk mixture. Cook over medium-low heat, stirring constantly with a wooden spoon or silicone spatula, until the custard thickens and coats the back of the spoon (it should reach 170-175°F). This takes about 8-10 minutes. Draw your finger across the spoon—if the line holds, your custard is ready.Step 4: Strain and Cool
Immediately strain the custard through a fine-mesh strainer into a clean bowl to remove any cooked egg bits. Stir in vanilla bean paste. Place the bowl in a larger bowl filled with ice water and stir occasionally until cooled to room temperature. Cover with plastic wrap pressed directly onto the surface (prevents skin from forming) and refrigerate for at least 4 hours or overnight. The colder the base, the better your gelato will be.Step 5: Churn the Gelato
Pour the chilled custard base into your ice cream maker and churn according to manufacturer’s instructions, usually 20-25 minutes. The gelato should be thick and creamy, similar to soft-serve consistency.Step 6: Prepare the Chocolate
During the last 5 minutes of churning, melt the chopped dark chocolate with coconut oil in a microwave-safe bowl in 20-second intervals, stirring between each, until completely smooth. Let it cool slightly—it should be liquid but not hot (about 90-95°F is ideal).Step 7: Create the Stracciatella
With the machine still running, slowly drizzle the melted chocolate in a thin stream into the churning gelato using a fork. The chocolate will immediately harden into thin shards when it hits the cold gelato. Don’t pour it all at once—drizzle slowly in a circular motion to create those signature irregular ribbons.Step 8: Freeze
Transfer the gelato to a freezer-safe container, smoothing the top. Press plastic wrap or parchment paper directly onto the surface. Freeze for at least 4 hours or until firm enough to scoop.Step 9: Serve
Remove gelato from freezer 5-10 minutes before serving to soften slightly. Scoop and serve immediately. Authentic gelato is best served slightly softer than American ice cream—at about 10-15°F warmer.Notes
- Temperature is Key: Use a thermometer for the custard—overcooking creates scrambled eggs, undercooking won’t thicken properly.
- Chocolate Quality Matters: Invest in good chocolate; it’s the co-star of this recipe. Valrhona, Guittard, or Ghirardelli work beautifully.
- Churning Speed: If your machine has speed settings, use medium-low for gelato (slower than ice cream).
- Don’t Skip Chilling: A thoroughly chilled base churns faster and creates smaller ice crystals (smoother gelato).
- Storage Tip: Gelato is best eaten within 3-5 days for optimal texture. After a week, ice crystals may form.
- No Ice Cream Maker?: While not traditional, you can pour the base into a shallow pan, freeze, and stir vigorously every 30 minutes for 3-4 hours, adding chocolate during the final stir.
- Prep Time: 25 minutes
- Cook Time: 15 minutes
- Category: Desert
- Method: Stovetop + Ice Cream Maker
- Cuisine: Italian
- Diet: Gluten Free
Nutrition
- Serving Size: ½ cup (approximately 100g)
- Calories: 285
- Sugar: 24g
- Sodium: 55mg
- Fat: 18g
- Saturated Fat: 10g
- Unsaturated Fat: 6g
- Carbohydrates: 27g
- Fiber: 1g
- Protein: 5g
- Cholesterol: 145mg
-
Tips & Variations
Flavor Variations:
- Hazelnut Stracciatella: Add ¼ cup Nutella to the base before churning and use milk chocolate for drizzling
- Mint Stracciatella: Replace vanilla with 1½ teaspoons peppermint extract
- Coffee Stracciatella: Dissolve 2 tablespoons instant espresso powder in the warm milk mixture
- Salted Caramel Stracciatella: Swirl in ¼ cup salted caramel sauce after adding chocolate
- White Chocolate Version: Use white chocolate for drizzling—less traditional but delicious
Texture Adjustments:
- For richer gelato: Increase cream to 1½ cups and reduce milk to 1½ cups
- For lighter gelato: Use 2½ cups milk and ½ cup cream
- For extra smooth: Add 1 tablespoon corn syrup or glucose (helps prevent ice crystals)
Dietary Modifications:
- Lower Sugar: Reduce sugar to ½ cup, but note that gelato will freeze harder
- Lactose-Free: Use lactose-free milk and cream
- Egg-Free Base: This won’t be authentic gelato, but you can use a Philadelphia-style base (no eggs) with added cornstarch for body
Chocolate Customization:
- Use 72% dark chocolate for more intense, less sweet chocolate
- Mix dark and milk chocolate (3:1 ratio) for a sweeter version
- Add a pinch of cinnamon or cardamom to the melted chocolate for complexity
- Try ruby chocolate for a fruity, pink-hued version
Pro Chef Tips
1. Master the Custard Temperature
The difference between perfect custard and scrambled eggs is just a few degrees. Keep your thermometer in the custard and stir constantly. The magic range is 170-175°F. If you don’t have a thermometer, the “coat the spoon” test works: the custard should coat a wooden spoon so that when you draw a line through it with your finger, the line holds without the custard running.2. Achieve the Perfect Chocolate Drizzle
Professional gelato makers drizzle chocolate from about 12 inches above the churning gelato. This creates thinner streams that break into smaller pieces. Hold your bowl high and let the chocolate fall in a thin, steady stream while moving your hand in circles. The height and movement are crucial for those delicate shards rather than chunky pieces.3. Embrace the Italian Serving Temperature
Italians serve gelato at 10-15°F warmer than American ice cream (around 15°F versus 0°F). This is why gelato tastes more flavorful—your taste buds can actually perceive the flavors better when they’re not numbed by extreme cold. Take your gelato out of the freezer 8-10 minutes before serving.4. Use the Overnight Aging Technique
While you can churn your custard base after 4 hours of chilling, gelato professionals know that aging the base overnight (12-24 hours) allows the fat molecules to crystallize properly and the flavors to meld. This creates noticeably smoother, more flavorful gelato.5. Store Like the Pros
Place a piece of plastic wrap or parchment directly on the gelato surface before sealing the container. This prevents ice crystals from forming due to temperature fluctuations when you open and close the freezer. Store gelato in the back of the freezer (coldest spot) rather than the door.6. Pre-Freeze Your Container
Before transferring freshly churned gelato, pop your storage container in the freezer for 30 minutes. This prevents the gelato from melting on contact with a room-temperature container, which can create ice crystals.Common Mistakes to Avoid
1. Rushing the Cooling Process
Many home cooks try to churn gelato with a base that’s merely cool rather than thoroughly cold. This results in a longer churn time, larger ice crystals, and grainy texture. Always chill your base for at least 4 hours, preferably overnight. The colder it is, the faster it churns, and the smoother your gelato will be.2. Using Hot Chocolate for the Drizzle
If your melted chocolate is too hot, it won’t harden quickly enough in the gelato and will just blend in, creating chocolate gelato rather than stracciatella. Let the melted chocolate cool to about 90-95°F—it should be liquid but not steaming. Test by drizzling a tiny amount into the churning gelato first.3. Over-Churning the Gelato
Once your gelato reaches soft-serve consistency, it’s done—don’t keep churning to make it firmer. Over-churning incorporates too much air, creating fluffy ice cream texture rather than dense gelato. The final firming happens in the freezer, not in the machine.4. Skipping the Straining Step
Even experienced cooks occasionally get a few bits of cooked egg in their custard. Always strain the custard after cooking. Those tiny specks might seem insignificant, but they affect the luxuriously smooth mouthfeel that defines great gelato. A fine-mesh strainer takes just seconds and ensures perfection.5. Storing Gelato Improperly
Storing gelato in a deep, narrow container means you’ll have to dig down every time you want a scoop, exposing the entire batch to temperature changes and air. Use a shallow, wide container instead—you can scoop from the top and quickly cover the remainder, preserving texture and preventing freezer burn.Storage & Meal Prep
Refrigerator Storage (Base):
The unwhipped custard base can be stored in the refrigerator for up to 3 days before churning. In fact, this “aging” process improves flavor and texture. Keep it in an airtight container with plastic wrap pressed directly on the surface.Freezer Storage (Finished Gelato):
Stracciatella gelato keeps well in the freezer for up to 2 weeks, though it’s at its absolute best within the first 5 days. Store in an airtight, freezer-safe container with plastic wrap pressed directly onto the gelato surface before sealing with the lid. This double protection prevents ice crystals and freezer burn.Texture Over Time:
Unlike commercial gelato which contains stabilizers, homemade gelato will gradually develop ice crystals after about a week due to temperature fluctuations in home freezers. The flavor remains excellent, but texture becomes slightly less smooth. For best results, try to finish your gelato within 7-10 days.Reheating/Softening:
Never microwave gelato to soften it—this melts it unevenly and ruins the texture. Instead, transfer from freezer to refrigerator 20-25 minutes before serving, or leave at room temperature for 8-10 minutes. Properly stored gelato should become scoopable without melting completely.Portion Control Tip:
If you know you won’t finish the gelato within a week, consider freezing it in individual portions using small mason jars or silicone molds. This way, you only thaw what you need, keeping the rest perfectly preserved.Make-Ahead & Freezer Notes
Make-Ahead Timeline:
3 Days Before: Make the custard base, chill thoroughly, and store in the refrigerator. This is actually ideal—the extended chilling time improves flavor.
1 Day Before: Churn the gelato and freeze. It will be at perfect scooping consistency the next day.
Day Of: Remove from freezer 8-10 minutes before serving.
Freezer-Friendly Details:
Yes! Stracciatella gelato is completely freezer-friendly and is, in fact, meant to be frozen. The key to maintaining quality is proper storage and minimizing temperature fluctuations. Each time you open the freezer or scoop some gelato, temperature changes occur. To minimize this:- Use an airtight container with minimal air space
- Press plastic wrap directly on the surface
- Keep the container at the back of the freezer (coldest area)
- Use a hot ice cream scoop (run under hot water, dry quickly) for cleaner scoops with less digging
Best Reheating/Serving Method:
The Italian way: Remove your gelato from the freezer and let it sit at room temperature for 8-10 minutes. It should soften just enough to scoop easily but still hold its shape on the scoop. If it’s melting or slumping, it’s too warm. If you can’t get a scoop out, it needs a few more minutes. This brief tempering time allows the flavors to fully express themselves—you’ll taste vanilla notes you didn’t know were there.Can You Re-Freeze Melted Gelato?
Technically yes, but the texture will be compromised with large ice crystals. If your gelato has partially melted (soft but still cold), you can return it to the freezer immediately. If it’s completely melted and warm, unfortunately the texture will be significantly affected upon refreezing—better to enjoy it as a milkshake at that point!Serving Suggestions
Stracciatella gelato is elegant enough to stand alone, but pairing it thoughtfully can create memorable dessert experiences:
Classic Italian Pairings:
- Espresso or strong coffee – The Italian way; the bitter coffee complements sweet gelato perfectly
- Biscotti – Dunk them in coffee, then take a bite of gelato
- Pizzelle – Traditional Italian waffle cookies make elegant gelato sandwiches
- Fresh berries – Especially strawberries or raspberries for color and tartness
- Amaretto liqueur – A small drizzle over gelato for an adult dessert
Elegant Plating Ideas:
- Serve in chilled martini glasses with a chocolate-dipped wafer cookie
- Present in vintage coupe glasses with a dusting of cocoa powder
- Create an affogato: place a scoop in a cup and pour hot espresso over it at the table
- Pair with a thin slice of olive oil cake or lemon pound cake
- Serve alongside chocolate torte or flourless chocolate cake
Casual Family Servings:
- Ice cream sundae bar with hot fudge, caramel, and whipped cream
- Between two chocolate chip cookies for gelato sandwiches
- In waffle cones (sugar cones are more traditional)
- With brownies for a “brownie sundae”
- Layered with chocolate sauce in parfait glasses
Beverage Pairings:
- Vin Santo (Italian dessert wine)
- Moscato d’Asti (sweet, slightly sparkling)
- Port or late-harvest Riesling
- Hot chocolate (for the ultimate chocolate experience)
- Limoncello (for contrast)
Garnish Ideas:
- Shaved dark chocolate
- Chopped toasted hazelnuts or almonds
- Fresh mint leaves
- Edible flowers (pansies look stunning)
- A drizzle of high-quality balsamic glaze (trust me on this!)
- Gold leaf for special occasions
FAQs Section
Q: Can I make this without an ice cream maker?
A: While an ice cream maker produces the best texture, you can make a no-churn version. Pour the chilled custard into a shallow metal pan, freeze for 45 minutes, then stir vigorously with a fork every 30 minutes for 3-4 hours until frozen but creamy. During the final stir, drizzle in the melted chocolate. The texture won’t be quite as smooth, but it will still be delicious.Q: Why is my gelato icy instead of creamy?
A: Icy texture usually comes from one of three issues: 1) the custard base wasn’t cold enough before churning, 2) there’s too much water content (check that you used whole milk and heavy cream, not lower-fat versions), or 3) the gelato has been stored too long or experienced temperature fluctuations. Make sure your base is ice-cold before churning and store properly with plastic wrap touching the surface.Q: Can I use vanilla extract instead of vanilla bean paste?
A: Absolutely! Use 2 teaspoons of pure vanilla extract instead of the 1 tablespoon of vanilla bean paste. You won’t get those beautiful vanilla specks, but the flavor will still be wonderful. Just make sure it’s pure vanilla extract, not imitation—the quality difference is noticeable in a simple recipe like this.Q: My chocolate formed big chunks instead of thin shards. What went wrong?
A: This happens when the chocolate is too cool or poured too fast. Make sure your chocolate is still liquid and slightly warm (around 90-95°F) but not hot. Pour it very slowly in a thin stream from about 12 inches above the churning gelato while moving your hand in circles. Think of drizzling honey—that’s the speed you’re aiming for. If it’s your first time, err on the side of pouring too slowly.Q: How is gelato different from ice cream?
A: Gelato has less cream and more milk than American ice cream, resulting in lower fat content (gelato: 4-8% fat vs. ice cream: 14-25% fat). Gelato is churned slower, incorporating less air, making it denser. It’s also served at a warmer temperature (10-15°F warmer), which is why flavors taste more intense. The lower fat content allows flavors to come through more clearly, and the denser texture feels more luxurious despite having less cream.Q: Can I reduce the sugar?
A: You can reduce sugar slightly (down to about ½-⅔ cup), but sugar isn’t just for sweetness—it prevents ice crystal formation and keeps gelato scoopable. Too little sugar creates a rock-hard, icy gelato. If you want less sweetness, I’d recommend reducing to ⅔ cup sugar as the minimum, and be prepared for a firmer texture that needs longer softening time before serving.Q: Is it safe to eat gelato made with raw eggs?
A: The eggs in this recipe are fully cooked when you make the custard base—that’s why you heat it to 170-175°F. This temperature pasteurizes the eggs, making them completely safe to eat. The custard method is different from no-churn recipes that use raw eggs. Always use fresh eggs and follow the temperature guidelines carefully.Q: Why does my homemade gelato melt faster than store-bought?
A: Commercial gelato contains stabilizers (like guar gum or carrageenan) that prevent quick melting. Your homemade version is pure and natural without these additives, so it will melt faster—which is actually a sign of quality! Keep your gelato very cold until serving time, and work quickly when scooping and plating.Conclusion
There’s something truly magical about creating authentic Italian stracciatella gelato in your own kitchen. From that first silky spoonful where the vanilla hits your palate, followed by the delicate crunch of chocolate that melts instantly on your tongue, to the satisfaction of knowing you made something truly special from scratch—this recipe is pure joy in frozen form.
Making gelato might seem intimidating at first, but once you’ve mastered the custard technique and experienced the fun of drizzling chocolate into churning gelato, you’ll find yourself returning to this recipe again and again. It’s one of those skills that impresses everyone but becomes second nature with practice.
Whether you’re serving this at your next dinner party, treating your family to a special weekend dessert, or simply indulging yourself after a long day, homemade stracciatella gelato never disappoints. The best part? You can adjust everything to your taste—more vanilla, darker chocolate, sweeter or less sweet—making it truly your own.
I’d love to hear how your stracciatella gelato turns out! Leave a comment below with your experience, any creative variations you tried, or questions you have. And if you loved this recipe, please give it a five-star rating and save it to your Pinterest dessert board so you can find it again easily. Your support helps other home cooks discover these authentic Italian recipes!
Now grab your ice cream maker, and let’s bring a little taste of Italy into your kitchen. Buon appetito! 🍦