Decadent Red Velvet Milkshake Recipe: The Ultimate Valentine’s Day Treat!

Get ready to fall head over heels for the most luxurious, show-stopping milkshake you’ll ever make—the Red Velvet Milkshake! This stunning crimson creation captures everything we love about classic red velvet cake and transforms it into a thick, creamy, utterly irresistible drink that’s equal parts dessert and beverage. Imagine the velvety chocolate-vanilla flavor of red velvet cake, that signature tangy cream cheese frosting, and a gorgeous deep red color—all blended into milkshake perfection.
This isn’t your ordinary chocolate shake. Red velvet milkshakes have that distinctive subtle cocoa flavor paired with a hint of buttermilk tang, topped with cream cheese whipped cream that tastes exactly like the frosting on your favorite red velvet cake. Each sip is pure indulgence, delivering that perfect balance of sweet, tangy, and chocolatey goodness that makes red velvet desserts so addictive.
Red velvet milkshakes have exploded in popularity across American diners, gourmet burger joints, and trendy dessert shops, especially around Valentine’s Day when that romantic red color makes it the perfect treat. But honestly, this milkshake is too good to save just for February 14th! Serve it at birthday parties (especially themed in red!), anniversary celebrations, girls’ night in, Christmas gatherings, or any time you want to create something that looks as spectacular as it tastes.
The beauty of this recipe is that it looks incredibly fancy and complicated—like something you’d pay $12 for at a specialty ice cream parlor—but it comes together in your home kitchen in just 10 minutes. No baking required, no waiting for cakes to cool, and no frosting disasters. Just blend, pour, and prepare for the compliments to roll in. Trust me, once you serve these gorgeous red beauties, everyone will be begging for the recipe!
History / Background
To understand the red velvet milkshake, we first need to appreciate the fascinating history of red velvet cake itself, which is steeped in Southern American tradition and a bit of culinary controversy. The origins of red velvet cake are somewhat disputed, but most food historians agree it emerged in the early 20th century, with several competing origin stories.
One theory traces red velvet back to the Victorian era when cakes were classified by their texture. “Velvet” cakes were fine-textured, softer cakes made with almond flour or cornstarch, which created that distinctive tender crumb. The “red” originally came from a natural chemical reaction: when cocoa powder (which was less processed back then and more acidic) combined with buttermilk’s acidity and vinegar, it would react and produce a reddish-brown hue. Some bakers enhanced this by using ingredients like beets to deepen the color.
The most widely accepted origin story credits the Waldorf-Astoria Hotel in New York City with popularizing red velvet cake in the 1920s. According to legend, a guest loved the cake so much she requested the recipe, only to receive a bill for hundreds of dollars. In revenge, she supposedly distributed the recipe widely and for free. While this story is likely more myth than fact, it helped cement red velvet’s place in American dessert culture.
The cake truly exploded in popularity in the 1940s and 1950s when Adams Extract Company launched a marketing campaign promoting their red food coloring alongside a red velvet cake recipe during World War II. This is when the cake took on its signature bright crimson color that we associate with it today. The South, particularly Texas and Georgia, embraced red velvet cake as a regional specialty, and it became a staple at church socials, weddings, and special celebrations throughout the Southern states.
Red velvet’s popularity waned somewhat in the 1960s and 70s but experienced a massive resurgence in the late 1990s and 2000s, partially thanks to the 1989 film “Steel Magnolias” which featured an iconic red velvet armadillo groom’s cake. The dessert became trendy again, spawning countless variations: red velvet cupcakes, cookies, cheesecake, pancakes, and yes—milkshakes!
The transformation of red velvet into milkshake form represents the American culinary tradition of taking beloved classic desserts and reimagining them in new, exciting ways. As milkshake culture evolved from simple ice cream sodas to elaborate, over-the-top creations (think “freakshakes” and Instagram-worthy monster shakes), it was only natural that red velvet would get the milkshake treatment.
The red velvet milkshake likely emerged in upscale burger restaurants and gourmet ice cream shops in the early 2010s as chefs looked for ways to create signature drinks that stood out. The combination of that gorgeous red color (perfect for photos!), the nostalgic appeal of red velvet cake, and the indulgent cream cheese element made it an instant hit. Today, it’s become a menu staple at chains like Red Robin, Johnny Rockets, and countless independent restaurants, while home cooks have embraced making their own versions for special occasions.
Why You’ll Love This Recipe
This red velvet milkshake is about to become your new favorite way to satisfy dessert cravings and impress absolutely everyone who lays eyes on it. It’s the kind of recipe that makes you look like a culinary genius while being secretly simple to execute—my favorite kind of recipe!
What sets this apart from regular chocolate milkshakes is that perfect combination of flavors and that stunning visual impact. The subtle cocoa flavor (it’s not aggressively chocolatey), the slight tang from buttermilk and cream cheese, and that velvety smooth texture create something truly special. And let’s be honest—that vibrant red color is a show-stopper that guarantees oohs and aahs before anyone even takes a sip.
Here’s why you’re going to absolutely love this red velvet milkshake:
- Ready in 10 minutes – Faster than driving to get one, and tastes even better than restaurant versions!
- Authentic red velvet flavor – Tastes exactly like drinking a slice of cake with cream cheese frosting
- Stunning presentation – That gorgeous red color with cream cheese topping is completely Instagram-worthy
- Perfect for special occasions – Valentine’s Day, Christmas, birthdays, anniversaries—this looks celebration-ready
- No baking required – All the red velvet flavor without turning on your oven
- Cream cheese frosting element – The whipped cream cheese topping is what makes this truly authentic
- Impressive but easy – Guests will think you spent hours, but you’ll know it took minutes
- Customizable intensity – Adjust the red color and chocolate level to your preference
- Kid and adult approved – Everyone loves the flavor and fun color
- Restaurant-quality at home – Save $10+ per shake by making your own
- Great for themed parties – Perfect for red-themed events, Valentine’s parties, or Christmas gatherings
- Makes fantastic photos – Pinterest and Instagram will love this gorgeous creation
- Unique twist on classics – More interesting than plain chocolate while still being approachable
Whether you’re a red velvet devotee, a milkshake enthusiast, or someone who simply appreciates desserts that taste as good as they look, this recipe delivers on every level. It’s indulgent without being overwhelmingly sweet, visually stunning without requiring artistic skills, and sophisticated enough for adults while being fun enough for kids.
Ingredient Notes
Let’s break down what goes into this gorgeous red creation. Each ingredient plays a specific role in recreating that authentic red velvet experience:
Vanilla Ice Cream: Your creamy base! Use high-quality vanilla ice cream—premium brands like Häagen-Dazs, Tillamook, or Ben & Jerry’s work beautifully because they have higher butterfat content and less air, creating a richer, thicker shake. You’ll need about 3-4 generous scoops (roughly 2 cups) per serving. Let it soften at room temperature for 5-10 minutes before blending—it should be soft enough to scoop easily but not melted into liquid. Some people actually use chocolate ice cream as the base, but vanilla is more traditional and lets the other flavors shine.
Cocoa Powder: This is essential for authentic red velvet flavor! Red velvet isn’t heavily chocolate—it’s subtly cocoa-forward. Use unsweetened cocoa powder (Dutch-process or natural both work). You’ll need about 1-2 tablespoons—enough to give that characteristic hint of chocolate without overwhelming everything. Don’t skip this thinking the food coloring alone will work—the cocoa is what makes it taste like red velvet rather than just pink vanilla.
Buttermilk: This is the secret ingredient that gives red velvet its signature tang! Traditional red velvet recipes always include buttermilk or vinegar-spiked milk because the acidity is essential to the flavor profile and the chemical reaction that creates the texture. For milkshakes, you’ll use about ¼ cup of buttermilk. Don’t have buttermilk? Make your own by mixing ¼ cup regular milk with ¾ teaspoon white vinegar or lemon juice—let it sit for 5 minutes before using. Some people substitute with plain yogurt thinned with milk, which also works.
Milk: Regular whole milk helps achieve the right consistency and makes blending easier. You’ll typically need ½ to ¾ cup depending on how thick you want your shake. Whole milk creates the richest result, but 2% works fine. You can even use chocolate milk for extra chocolate flavor!
Red Food Coloring: This is what gives red velvet its iconic crimson hue. Use gel food coloring for the most vibrant color with less liquid—liquid food coloring works but requires more drops and can thin your shake. You’ll need about ½ to 1 teaspoon of gel coloring or 1-2 teaspoons of liquid. Red velvet traditionally uses “Red #40” coloring. For a natural option, you can use beet juice, though the color will be more maroon than bright red and you’ll need quite a bit (¼ cup), which affects consistency.
Cream Cheese (for topping): This is non-negotiable if you want authentic red velvet flavor! Cream cheese frosting is THE defining element of red velvet cake. You’ll use softened cream cheese whipped with heavy cream and powdered sugar to create a frosting-like whipped topping. Use full-fat brick-style cream cheese (Philadelphia is ideal), not spreadable cream cheese from a tub. You’ll need about 4 ounces (half a standard package) for topping two shakes.
Heavy Cream (for topping): Whipped with the cream cheese to create that signature cream cheese frosting topping. You’ll need about ½ cup of heavy whipping cream. Don’t use half-and-half or milk—you need the fat content of heavy cream for proper whipping.
Powdered Sugar: For sweetening both the milkshake itself and the cream cheese topping. Powdered sugar dissolves more easily than granulated in cold mixtures. You’ll need about 2-3 tablespoons for the shake and 2-3 tablespoons for the topping.
Vanilla Extract: Just a splash (½ teaspoon) enhances all the other flavors and adds that characteristic bakery flavor. Use pure vanilla extract, not imitation, for the best taste.
Optional – White Chocolate Chips: Some recipes include a handful of white chocolate chips blended in for extra richness and a subtle white chocolate undertone that complements red velvet beautifully.
Optional Garnishes: Red velvet cake crumbles, chocolate shavings, sprinkles, or even a mini red velvet cupcake perched on top for ultimate wow-factor!
Equipment Needed
Making this spectacular milkshake requires minimal equipment that you likely already own:
- High-powered blender: Essential for creating that smooth, creamy texture. Vitamix, Blendtec, Ninja, or any standard countertop blender works. The more powerful your blender, the smoother your shake will be.
- Electric mixer or whisk: For whipping the cream cheese topping. A hand mixer, stand mixer, or even a good old-fashioned whisk works, though electric is much easier.
- Measuring cups and spoons: For accurate measurements, especially important for the cocoa powder and food coloring
- Ice cream scoop: Makes portioning the ice cream consistent and easy
- Mixing bowl: Medium-sized bowl for preparing the cream cheese topping
- Spatula: For scraping down the blender and for folding the cream cheese mixture
- Tall glasses: Red velvet milkshakes look stunning in tall, clear glasses—16-20 ounce capacity is ideal. Mason jars or old-fashioned soda fountain glasses work perfectly.
- Piping bag with star tip (optional): For professionally piping the cream cheese topping. A ziplock bag with the corner cut off works too, or just spoon it on!
- Thick straws: Wide milkshake straws are essential—regular straws collapse under the pressure of this thick shake
- Small offset spatula (optional): For smoothly spreading or swirling the topping
That’s really all you need! The blender does the heavy lifting, and everything else is just assembly and presentation.
Print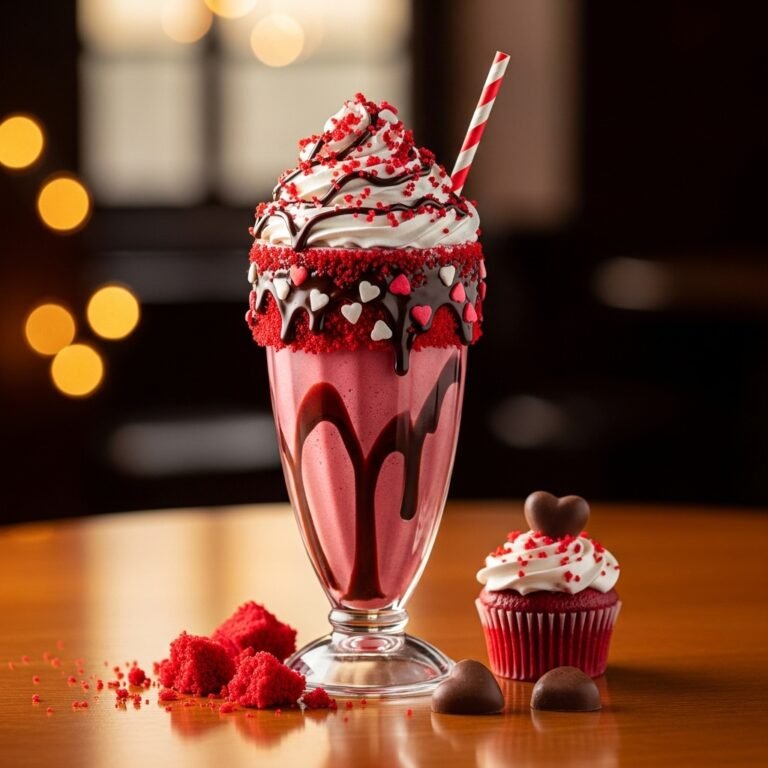
Red Velvet Milkshake Recipe
This ultra-decadent Red Velvet Milkshake tastes exactly like drinking your favorite cake! It features the signature subtle chocolate-vanilla flavor, gorgeous red color, and is topped with cream cheese frosting whipped cream. Perfect for Valentine’s Day or any celebration!
- Total Time: 10 minutes
- Yield: 2 large milkshakes 1x
Ingredients
For the Milkshake:
- 4 cups (8 scoops) vanilla ice cream, slightly softened
- 2 tablespoons unsweetened cocoa powder
- ¼ cup buttermilk
- ½ cup whole milk (adjust for desired thickness)
- 2-3 tablespoons powdered sugar (adjust to taste)
- 1 teaspoon vanilla extract
- ½-1 teaspoon red gel food coloring (or 1-2 teaspoons liquid)
- 2 tablespoons white chocolate chips (optional)
For the Cream Cheese Topping:
- 4 ounces cream cheese, softened to room temperature
- ½ cup heavy whipping cream, cold
- 2-3 tablespoons powdered sugar
- ½ teaspoon vanilla extract
For Garnish:
- Red velvet cake crumbles or chocolate shavings
- Chocolate syrup drizzle (optional)
- Sprinkles (optional)
Instructions
- Prepare cream cheese topping first: In a medium mixing bowl, beat the softened cream cheese with an electric mixer until smooth and fluffy, about 1-2 minutes. Add the cold heavy cream, powdered sugar, and vanilla extract. Beat on medium-high speed until stiff peaks form, about 2-3 minutes. The mixture should look like cream cheese frosting. Set aside in the refrigerator while you make the shake.
- Soften your ice cream: Remove ice cream from freezer and let sit at room temperature for 5-10 minutes until soft enough to scoop easily but not melted. This makes blending much easier and creates a smoother texture.
- Prepare food coloring: If using gel food coloring, mix it with 1 tablespoon of milk in a small cup until smooth. This helps it distribute evenly throughout the shake. If using liquid food coloring, you can add it directly.
- Add milkshake ingredients to blender: Start with the buttermilk and regular milk (liquids first help blending). Add the cocoa powder and stir slightly to prevent cocoa clouds when you start blending. Add powdered sugar, vanilla extract, and your prepared food coloring. Finally, add the softened ice cream on top. If using white chocolate chips, add them now.
- Blend on low first: Start blending on low speed for about 10-15 seconds to break everything down. You may need to stop and use a spatula to push ingredients toward the blades if your blender isn’t catching everything. This low-speed start prevents splashing and helps ingredients incorporate.
- Increase to high speed: Once roughly combined, increase to high speed and blend for 30-45 seconds until completely smooth and uniformly red. The color should be consistent throughout—no streaks. Stop blending as soon as it’s smooth; over-blending melts the ice cream.
- Check and adjust: Stop the blender and check consistency and color. Insert a spoon—it should stand upright but slowly fall over. Too thick to pour? Add 2-4 tablespoons more milk and pulse briefly. Too thin? Add another scoop of ice cream. Not red enough? Add a few more drops of coloring and pulse. Not chocolatey enough? Add another ½ tablespoon cocoa powder.
- Taste test: Dip a clean spoon and taste. Adjust sweetness if needed by adding more powdered sugar. The flavor should be subtly chocolate with a slight tang from the buttermilk—that’s authentic red velvet!
- Prepare glasses: For an extra special touch, drizzle chocolate syrup inside your serving glasses in a spiral pattern, then rotate the glass so it creates decorative lines. This is optional but looks amazing!
- Pour the milkshake: Remove any prepared glasses from the freezer if you’ve been chilling them. Pour the red velvet milkshake into tall glasses, leaving about 2 inches at the top for the cream cheese topping. The shake should be thick and pour slowly.
- Add cream cheese topping: Remove your cream cheese mixture from the refrigerator. Using a piping bag with a star tip, pipe generous swirls on top of each milkshake. If you don’t have a piping bag, simply spoon large dollops on top and use the back of a spoon to create swirls. Be generous—this topping is what makes it authentically red velvet!
- Garnish and serve: Top with red velvet cake crumbles, chocolate shavings, or sprinkles. Add a drizzle of chocolate syrup if desired. Insert thick straws and serve immediately with long spoons so people can eat the cream cheese topping!
Notes
- Color intensity: The amount of food coloring needed varies by brand. Add gradually until you achieve your desired shade—some prefer deep crimson, others like lighter pink-red.
- Buttermilk substitute: If you don’t have buttermilk, mix ¼ cup milk with ¾ teaspoon white vinegar or lemon juice. Let sit 5 minutes before using.
- Cream cheese must be soft: Room temperature cream cheese is crucial for the topping. Cold cream cheese won’t whip properly.
- Thickness control: The ratio of ice cream to liquids controls thickness. Start with less liquid—you can always add more.
- Make it more chocolatey: For a more intense chocolate flavor, use chocolate ice cream as the base or add an extra tablespoon of cocoa powder.
- Sweetness: Adjust sugar based on your ice cream’s sweetness and personal preference.
- Serve immediately: Milkshakes are best within 5-10 minutes of making them, before they start to melt.
- Prep Time: 10 minutes
- Cook Time: 0 minutes
- Category: Dessert, Beverage, Treat
- Method: Blending
- Cuisine: American, Southern
- Diet: Gluten Free
Nutrition
- Serving Size: 1 large milkshake (about 20 oz)
- Calories: 720
- Sugar: 72g
- Sodium: 295mg
- Fat: 42g
- Saturated Fat: 26g
- Unsaturated Fat: 13g
- Trans Fat: 1g
- Carbohydrates: 78g
- Fiber: 2g
- Protein: 11g
- Cholesterol: 140mg
Tips & Variations
This red velvet milkshake is wonderfully versatile! Here are some creative ways to customize it:
Red Velvet Oreo Shake: Add 4-5 Oreo cookies to the blender for a cookies and cream twist. The chocolate cookies complement the red velvet flavor beautifully and add amazing texture.
Extra chocolate version: Use chocolate ice cream instead of vanilla, or add 2 tablespoons of chocolate syrup to the blend. This creates a more intensely chocolate-forward shake for serious choc
olate lovers.
White chocolate red velvet: Increase the white chocolate chips to ½ cup for a more pronounced white chocolate flavor that pairs wonderfully with the cocoa and cream cheese.
Protein-packed: Add a scoop of vanilla protein powder to make this more substantial. Greek yogurt can also be added for extra protein and tanginess.
Lighter version: Use low-fat ice cream, reduced-fat cream cheese (Neufchâtel), skim milk, and sugar-free sweetener. Replace some ice cream with frozen banana for natural sweetness and creaminess. It won’t be quite as decadent but still delicious!
Dairy-free/vegan: Use dairy-free vanilla ice cream (coconut or cashew-based work best), coconut milk, and vegan cream cheese. The flavor will be different but still enjoyable!
Boozy adult version: Add 1-2 ounces of vanilla vodka, Baileys Irish Cream, or Kahlua for a sophisticated grown-up treat. RumChata also pairs beautifully with red velvet flavors.
Red velvet cheesecake shake: Blend in 2-3 ounces of actual cheesecake chunks along with the other ingredients for double the cream cheese flavor and a richer texture.
Mocha red velvet: Add a shot of espresso or 2 tablespoons of strong cold brew coffee. Coffee enhances chocolate flavors and adds sophistication.
Peppermint red velvet: Add ¼ teaspoon peppermint extract for a holiday-themed version perfect for Christmas. Garnish with crushed candy canes.
Natural coloring: Replace artificial food coloring with ¼ cup beet juice for a more natural (though less vibrant) red color. The beet flavor is barely detectable when properly balanced.
Layered effect: Make half the recipe without food coloring (vanilla), then make half with red coloring. Layer them in the glass for a stunning pink and white striped effect.
Pro Chef Tips
After researching professional recipes and experimenting extensively, I’ve discovered some tricks that elevate this shake from good to extraordinary:
Bloom the cocoa powder: Before adding cocoa to your blender, mix it with 2 tablespoons of hot water to create a paste. This “blooming” process releases the cocoa’s full flavor and prevents those annoying cocoa lumps that sometimes don’t blend out. Let it cool before adding to your cold ingredients.
Freeze your glasses: Put your serving glasses in the freezer for at least 20 minutes before making your shake. Ice-cold glasses keep your milkshake from melting too quickly and maintain that perfect thick consistency longer.
The soft-serve secret: Professional ice cream shops add a tablespoon of corn syrup to their shakes. This prevents ice crystals, creates impossibly smooth texture, and makes the shake stay creamy longer. It’s completely optional but makes a noticeable difference.
Whip cream cheese separately first: Before adding heavy cream, whip the cream cheese alone until it’s fluffy and doubled in volume (about 2 minutes). Then add the cream and continue whipping. This two-stage process creates the fluffiest, most frosting-like topping.
Temperature contrast: Keep your ice cream very cold but your cream cheese very soft (room temperature). This temperature contrast actually helps both components work better—the cold ice cream stays thick while the soft cream cheese incorporates smoothly.
Don’t over-blend: Once your shake is smooth and uniformly colored, stop immediately. Over-blending introduces too much air and melts the ice cream, creating a thin, foamy shake instead of thick and creamy. Most blenders need only 30-60 seconds total.
Layer your food coloring: For the most vibrant, truest red color, divide your food coloring. Add half at the beginning of blending, then add the second half and pulse just a few times. This creates more depth of color.
The professional garnish trick: Before adding the cream cheese topping, use a small offset spatula to spread a very thin layer of the topping inside the top inch of your glass. This creates a “frosted” rim effect that looks incredibly professional.
Use cake crumbles strategically: If garnishing with red velvet cake crumbles, press them slightly into the cream cheese topping so they stick rather than just sitting loosely on top. This looks better and prevents them from falling off when people try to drink.
Create a flavor concentrate: Mix your cocoa powder, buttermilk, vanilla, and food coloring together first in a small bowl until completely smooth. This creates a “flavor base” that distributes more evenly throughout the shake than adding ingredients separately.
Common Mistakes to Avoid
Even with a relatively simple recipe, several common errors can prevent your red velvet milkshake from being perfect:
Using cold, hard cream cheese for the topping: This is the #1 mistake! Cold cream cheese will NOT whip into a fluffy frosting-like consistency no matter how long you beat it. It must be softened to room temperature for at least 30-60 minutes, or microwaved very briefly (10-15 seconds) until soft but not melted. If you try to whip cold cream cheese, you’ll end up with a lumpy, separated mess.
Adding too much liquid: It’s tempting to add lots of milk to make blending easier, but this creates a thin, runny shake instead of that thick, spoonable consistency red velvet shakes should have. Start with less liquid than you think you need—you can always add more, but you can’t remove it. Remember: a proper milkshake should be thick enough to require effort through a straw!
Not using enough cocoa powder: Red velvet isn’t just vanilla with red food coloring—the subtle chocolate flavor from cocoa powder is essential to authentic taste. Skimping on cocoa results in a shake that tastes like pink vanilla rather than true red velvet. Don’t be afraid of the cocoa; just remember it should be subtle, not overwhelming.
Over-blending the shake: Once everything is smooth, stop blending immediately! Continued blending melts your ice cream, incorporates too much air (making it foamy), and warms it up, resulting in a thin shake instead of thick and creamy. Most shakes only need 30-60 seconds of total blend time.
Skipping the buttermilk: The slight tang from buttermilk is what differentiates red velvet from regular chocolate cake. Without it, your shake will taste good but not authentically “red velvet.” The buttermilk (or buttermilk substitute) is essential for that characteristic flavor profile.
Using cheap ice cream: Low-quality ice cream with lots of air and stabilizers creates an inferior shake. The extra few dollars for premium ice cream (with higher butterfat and less air) makes an enormous difference in richness and texture. Look for ice cream that’s dense and heavy for its size.
Wrong food coloring ratio: Too little food coloring results in a disappointing pink rather than that iconic deep red. Too much can create an artificial taste or even a slightly bitter note. Add gradually and remember that gel food coloring is much more concentrated than liquid—a little goes a long way!
Storage & Meal Prep
Red velvet milkshakes are definitely best enjoyed fresh and cold, but here’s what you need to know about storage:
Can you refrigerate red velvet milkshakes? Not really—refrigerating a milkshake doesn’t work well. The ice cream melts completely, separating into milk at the bottom and a weird icy layer on top. If you must store leftovers, freeze them instead.
Freezer storage: Pour leftover shake into an airtight freezer-safe container and freeze for up to 3 days. It will freeze solid. To enjoy, let sit at room temperature for 15-20 minutes until it reaches soft-serve consistency, then stir vigorously or give it a quick 5-second blend to restore texture.
Cream cheese topping storage: The whipped cream cheese topping can be made ahead and stored in an airtight container in the refrigerator for up to 3 days. It may separate slightly as it sits—just give it a quick whisk before using to restore the fluffy texture.
Texture after storage: Even with proper freezing, stored milkshake won’t be quite as smooth and perfect as fresh. The texture becomes slightly icier and less creamy. It’s still tasty but not restaurant-quality anymore.
Why fresh is best: Milkshakes are at their absolute peak perfection within 5-10 minutes of making them. That’s when the texture is ideal, the temperature is perfect, and all the flavors are bright and vibrant. Plan to make and serve immediately whenever possible.
Individual portions: If you want milkshakes throughout the week, consider portioning the prepared shake (before adding topping) into individual freezer-safe containers. Thaw one at a time as needed and top with fresh whipped cream cheese.
Make-Ahead & Freezer Notes
While fresh is ideal, there are smart strategies for advance prep:
Pre-measure dry ingredients: Combine cocoa powder and powdered sugar in a small container. When milkshake craving hits, just dump this pre-measured mix into the blender with your other ingredients—cuts prep time in half!
Make cream cheese topping ahead: Prepare the whipped cream cheese topping up to 3 days in advance. Store covered in the refrigerator. Whisk briefly before using to fluff it back up. This is one component that actually holds up well!
Freeze in popsicle molds: Pour your red velvet milkshake mixture into popsicle molds for the most amazing red velvet popsicles! These keep for up to 2 months in the freezer and make fantastic summer treats or party desserts.
Ice cream “pucks”: Scoop your ice cream into individual serving portions on a parchment-lined baking sheet. Freeze solid, then store in a freezer bag. When you want a shake, just grab pre-portioned ice cream pucks—no scooping required!
Buttermilk ice cubes: Freeze buttermilk in ice cube trays. Each cube is about 2 tablespoons. When making shakes, use 2 buttermilk cubes instead of liquid buttermilk—this actually makes the shake thicker and eliminates the need for some regular ice cream!
Red velvet “base” concentrate: Mix cocoa powder, buttermilk, food coloring, and vanilla into a concentrated flavor paste. Freeze in ice cube trays. Pop 2-3 cubes into your blender with ice cream and milk for instant red velvet flavor without measuring individual ingredients.
Cake crumble prep: Bake red velvet cake (or buy a slice from a bakery), crumble it, and freeze in portions. These crumbles are perfect for garnishing and last up to 3 months frozen.
“Reheating” instructions: There’s no reheating (obviously!), but to revive frozen leftover shake: remove from freezer, let sit at room temperature for 15-20 minutes until it reaches soft-serve consistency, then stir well or blend briefly for 5-10 seconds to restore smooth texture.
Serving Suggestions
Red velvet milkshakes are so special they can be served in countless ways for different occasions:
Valentine’s Day perfection: This is THE ultimate Valentine’s treat! Serve in wine glasses with heart-shaped strawberries on the rim. Make it a romantic dessert for two, paired with chocolate-dipped strawberries.
Birthday celebration: Red velvet milkshakes make incredible birthday treats, especially for red-themed parties. Serve with a full slice of red velvet cake on the side or even perch a mini cupcake on top of the shake!
Christmas beverage: The red color makes these perfect for Christmas! Serve in clear mugs, garnish with white chocolate shavings and a candy cane for festive flair.
Brunch indulgence: Pair with waffles, pancakes, or French toast for an over-the-top special occasion brunch. It’s dessert and beverage in one!
Movie night treat: Skip regular snacks and serve these show-stopping shakes for family movie night. They’re guaranteed to make any movie better!
Girls’ night in: Make a milkshake bar with multiple flavors—red velvet alongside strawberry and chocolate. Let everyone customize their own toppings.
After-dinner dessert: Serve instead of cake or pie after dinner parties. Guests will be thrilled by something so unexpected and impressive!
What pairs well:
- Red velvet cake or cupcakes (yes, dessert with dessert!)
- Chocolate chip cookies or brownies
- Fresh strawberries or raspberries
- Gourmet burgers and fries (diner-style pairing)
- Chicken and waffles (sweet and savory contrast)
- Cheese and crackers (before dessert as a sweet beverage)
- Nothing—it’s perfect as a standalone treat!
Presentation ideas: Serve with long-handled spoons and wide straws, rim glasses with chocolate or graham cracker crumbs, drizzle the inside of glasses with chocolate or strawberry sauce before pouring, garnish with whole strawberries and mint leaves, add edible gold leaf for fancy occasions, serve in mason jars with handle for rustic charm.
FAQs Section
Can I make this without buttermilk?
Absolutely! Make your own buttermilk substitute by combining ¼ cup regular milk with ¾ teaspoon white vinegar or lemon juice. Let it sit for 5 minutes to curdle slightly before using—this creates the same tang and acidity that buttermilk provides. Plain yogurt thinned with milk (2 tablespoons yogurt + 2 tablespoons milk) also works well as a substitute.
Is red velvet just chocolate cake with food coloring?
Not quite! While red velvet does contain cocoa powder, it’s much less than traditional chocolate cake—giving it a subtle chocolate hint rather than dominant chocolate flavor. The defining characteristics of red velvet are: (1) the combination of buttermilk’s tang with subtle cocoa, (2) the signature cream cheese frosting, and (3) a uniquely tender, velvety texture. The red color was originally a natural byproduct of chemical reactions, though modern recipes use food coloring to achieve that iconic crimson hue. So while they share cocoa as an ingredient, red velvet has its own distinct flavor profile that’s more complex and nuanced than simple chocolate.
Can I make this without food coloring?
Yes, though it won’t be visually “red velvet” anymore! You can use natural beet juice (about ¼ cup) for a more burgundy-maroon color, though this does affect the consistency and adds a very subtle earthy note. Some people use freeze-dried strawberry powder for a natural pink-red tint. Honestly though, if you skip coloring entirely, you’ll have a delicious chocolate-buttermilk milkshake that tastes like red velvet but looks brown. It’s still yummy—just not as visually stunning! The food coloring is really about aesthetics and tradition rather than flavor.
Why is my milkshake too thin?
This usually happens from too much liquid (milk and buttermilk combined). To fix a thin shake: add more ice cream—one scoop at a time—and blend briefly after each addition until you reach desired thickness. You can also add a handful of ice cubes, though this dilutes flavor slightly. For future batches, start with less milk (just ½ cup instead of ¾) and add more only if the blender is struggling. Remember, you can always thin a shake, but thickening it is harder! A proper milkshake should be thick enough that a straw stands upright in it.
Can kids drink this?
Absolutely! This is completely kid-friendly with no alcohol or coffee. Children typically love the fun red color and sweet flavor. However, it is quite rich and high in sugar, so consider it an occasional special treat rather than regular fare. You might want to serve smaller portions to young children (8-10 ounces instead of 16-20). Some parents split one adult-sized shake between two kids, which is plenty!
How do I make the cream cheese topping fluffy?
The key is starting with properly softened cream cheese—it must be room temperature, not cold from the fridge. Beat the cream cheese alone for 1-2 minutes until it’s fluffy before adding the heavy cream. Use cold heavy cream (not cream that’s been sitting out), and beat on medium-high speed for 2-3 minutes until stiff peaks form. If your mixture isn’t thickening, you may have added too much cream relative to cream cheese, or your cream wasn’t cold enough. Also, make sure you’re using heavy whipping cream, not half-and-half or milk, which won’t whip properly.
Can I use chocolate ice cream instead of vanilla?
You definitely can! Chocolate ice cream creates a more intensely chocolate red velvet shake—some people prefer this deeper chocolate flavor. However, traditional red velvet is more subtle in its chocolate notes, which is why vanilla ice cream is more authentic. If you want something in between, try using half vanilla and half chocolate ice cream. Just remember that chocolate ice cream will darken your red color slightly, making it more of a burgundy-red rather than bright crimson.
My shake tastes too much like buttermilk. Help!
If the tang is overwhelming, you’ve likely used too much buttermilk or your buttermilk is particularly tangy. Next time, reduce the buttermilk to 2-3 tablespoons instead of ¼ cup. You can also balance excessive tang by adding more powdered sugar (sweetness counters tang) or an extra tablespoon of cocoa powder. Some people prefer using half buttermilk and half regular milk for a milder tang. The buttermilk flavor should be subtle—just a pleasant hint of tanginess that complements the sweet cream cheese topping, not a dominant sour note.
Conclusion
And there you have it—your complete guide to making the most spectacular, show-stopping Red Velvet Milkshake right in your own kitchen! This isn’t just another milkshake recipe; it’s a full dessert experience that combines the beloved flavors of red velvet cake with the pure joy of a thick, creamy shake. Every element works together perfectly—that subtle cocoa flavor, the buttermilk tang, the gorgeous crimson color, and especially that incredible cream cheese topping that tastes exactly like the frosting on your favorite cake.
What I absolutely love about this recipe is how it delivers maximum wow-factor with minimal effort. In just 10 minutes, using a standard blender and ingredients from any grocery store, you can create something that looks like it came from a high-end dessert shop and tastes even better. Whether you’re celebrating Valentine’s Day, hosting a birthday party, impressing guests at a dinner party, or simply treating yourself because you deserve something amazing, this red velvet milkshake delivers every single time.
The beauty of this recipe is also in its versatility—make it exactly as written for authentic red velvet flavor, or customize it with any of the variations to suit your preferences. Add Oreos for texture, boost the chocolate for intensity, make it lighter for fewer calories, or go completely over-the-top with extra garnishes and toppings. There’s no wrong way to enjoy this incredible creation!
Now I’m absolutely dying to hear about YOUR red velvet milkshake experience! Did that gorgeous red color make everyone stop and stare? How did your cream cheese topping turn out? Did you try any creative variations or garnishes? Drop a comment below and share your thoughts—I genuinely read every comment and love hearing from you! And if this recipe brought a smile to your face (or you know it would make someone else’s day), please pin it to your Pinterest boards and share it with your friends and family. Let’s spread the red velvet love!
So grab that blender, gather your ingredients, and get ready to create something truly special. Your taste buds—and anyone lucky enough to share this with you—are about to experience pure bliss in a glass! 💗🍰🥤
Happy blending, my friends!