The Ultimate Banana Split Milkshake Recipe: A Dreamy Dessert in a Glass
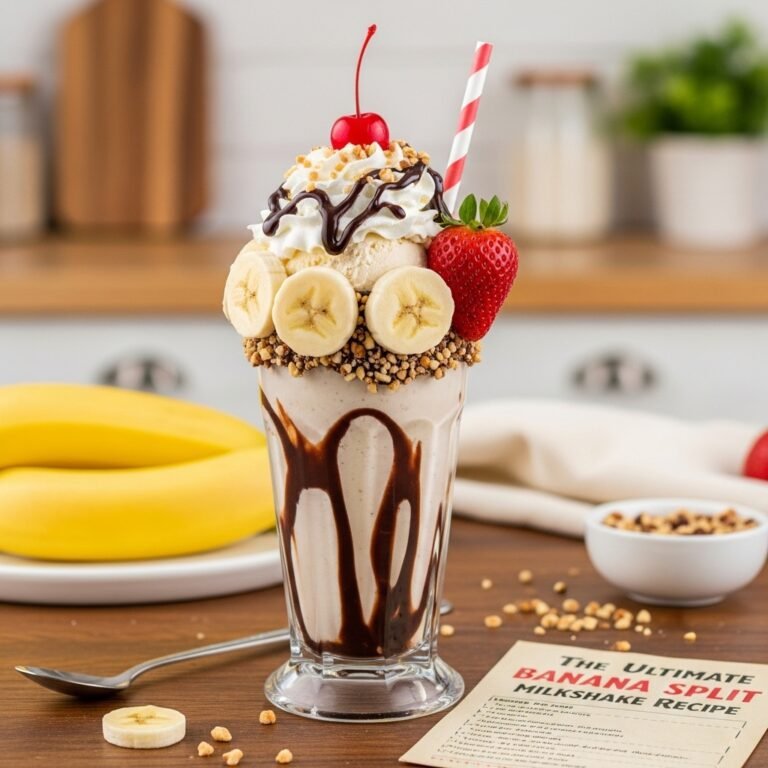
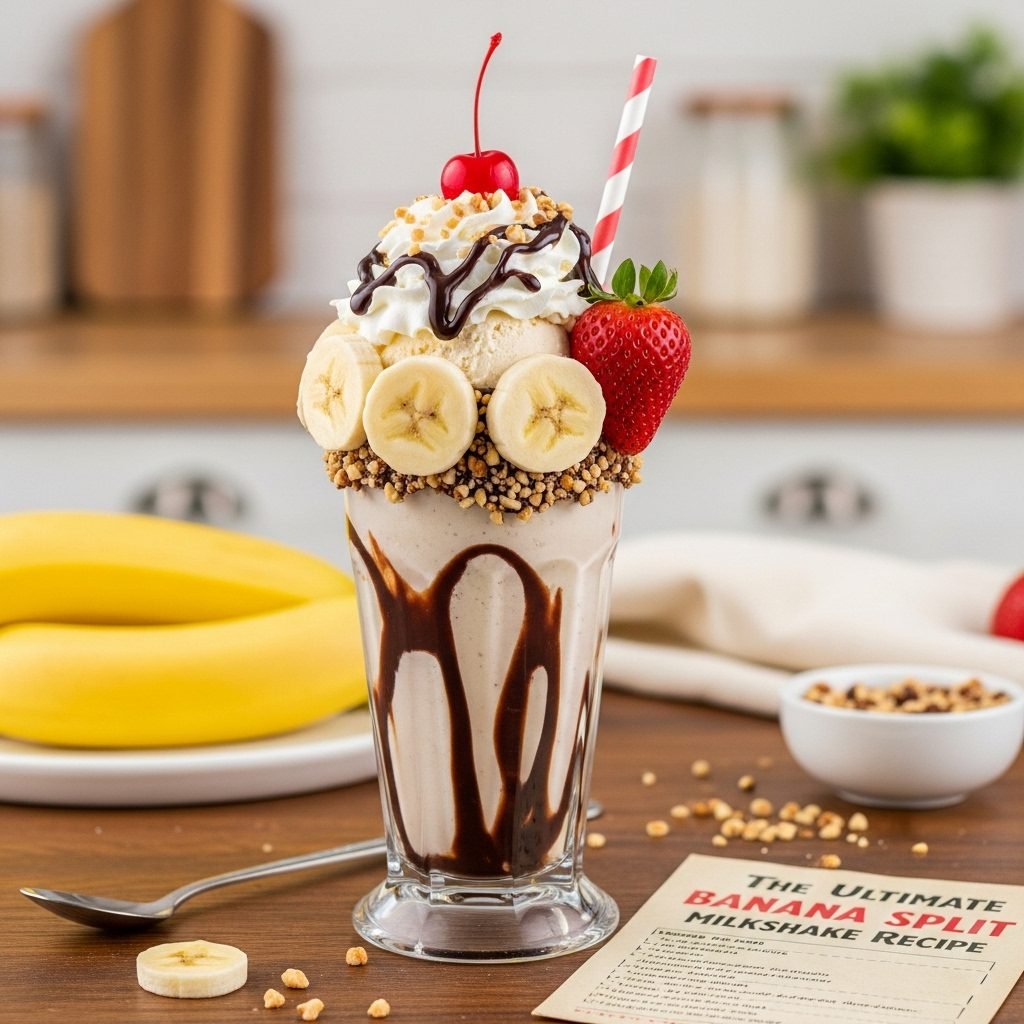
Picture this: all the nostalgic flavors of a classic banana split—creamy vanilla ice cream, ripe bananas, luscious chocolate and strawberry syrups, fluffy whipped cream, and that signature cherry on top—blended into one irresistible, sippable treat. That’s exactly what this Banana Split Milkshake delivers, and trust me, it’s every bit as magical as it sounds.
This isn’t just any ordinary milkshake. It’s a celebration in a glass, combining the beloved flavors of America’s most iconic ice cream sundae into a thick, creamy, utterly indulgent beverage that both kids and adults go absolutely crazy for. Whether you’re cooling down on a hot summer afternoon, treating the family after a backyard barbecue, or simply craving something sweet that hits all the right notes, this banana split milkshake is your answer.
What makes this recipe so special is its versatility. It’s perfect for birthday parties, Fourth of July celebrations, casual weeknight desserts, or those moments when you want to surprise your loved ones with something extraordinary without spending hours in the kitchen. The best part? You can whip up this showstopper in under ten minutes with ingredients you probably already have in your freezer and pantry.
So grab your blender, round up the toppings, and let’s create a milkshake that’ll transport you straight to your favorite old-fashioned ice cream parlor—right from the comfort of your own kitchen.
History & Background
The banana split has a fascinating history that’s deeply rooted in American culinary culture, and understanding its origins makes this milkshake version even more special. The classic banana split sundae was invented in 1904 by David Evans Strickler, a 23-year-old apprentice pharmacist at Tassel Pharmacy in Latrobe, Pennsylvania. Strickler created this elaborate dessert to attract students from nearby Saint Vincent College, and boy, did it work.
The original creation featured a banana split lengthwise (hence the name), topped with three scoops of ice cream—traditionally vanilla, chocolate, and strawberry—each adorned with different toppings. Chocolate sauce went on one scoop, strawberry on another, and pineapple on the third, all finished with whipped cream, chopped nuts, and maraschino cherries. It was a masterpiece of American indulgence, priced at a then-extravagant 10 cents (double the price of other sundaes).
The banana split quickly became a sensation, spreading across the country through soda fountains and ice cream parlors that were the social hubs of early 20th-century America. It represented more than just a dessert—it symbolized celebration, togetherness, and the simple joy of treating yourself to something special.
Fast forward to today, and the banana split remains an enduring symbol of Americana. The milkshake adaptation brings all those cherished flavors into a more convenient, portable format while maintaining every ounce of that nostalgic charm. It’s the perfect marriage of tradition and modern convenience, honoring a century-old classic while making it accessible for today’s busy home cooks.
Latrobe, Pennsylvania, still celebrates its claim to banana split fame with an annual Great American Banana Split Celebration, proving that this beloved treat continues to hold a special place in American hearts—and stomachs.
Why You’ll Love This Recipe
If you’re looking for a dessert that delivers maximum wow factor with minimum effort, this banana split milkshake is about to become your new best friend. It captures everything we adore about the classic sundae while being infinitely easier to prepare and enjoy.
Here’s why this recipe deserves a permanent spot in your dessert rotation:
- Incredibly Quick & Easy: From start to finish, you’re looking at less than 10 minutes of actual work. No baking, no complicated techniques, no stress.
- Budget-Friendly: Made with simple, affordable ingredients you likely already have on hand. No need for specialty items or expensive equipment.
- Family-Friendly Favorite: Kids absolutely light up when they see this colorful creation, and adults secretly love it just as much. It’s a crowd-pleaser across all ages.
- Endlessly Customizable: Easily adjust sweetness levels, swap out toppings, or modify for dietary needs. Make it your own every single time.
- Perfect for Entertaining: Impressive enough for parties yet simple enough for a random Tuesday. Your guests will think you put in way more effort than you actually did.
- No-Cook Dessert: Keep your kitchen cool during hot summer months—this recipe doesn’t require turning on the oven or stovetop.
- Portion Control Made Fun: Unlike a traditional banana split that can be overwhelming, a milkshake offers built-in portion sizing while still feeling indulgent.
- Nostalgic Comfort: There’s something deeply comforting about these classic American flavors that instantly lifts your mood and brings back happy memories.
Ingredient Notes
Let’s talk about what goes into this dreamy creation and why each ingredient matters. Understanding your ingredients helps you make smart substitutions and achieve the best possible results.
Ripe Bananas: The star of the show! Look for bananas with a few brown spots—they’re sweeter and blend more smoothly. Overly green bananas will taste starchy and won’t provide that signature banana split flavor. For an extra-thick, frosty shake, freeze your banana chunks for at least two hours beforehand.
Vanilla Ice Cream: Use a good-quality vanilla ice cream for the creamiest results. Full-fat varieties blend better and create that luxuriously thick texture we’re after. Store brands work perfectly fine—no need to splurge on premium unless you want to. For a lighter version, frozen vanilla yogurt is a decent substitute.
Whole Milk: This helps thin the milkshake to a drinkable consistency while adding creaminess. You can adjust the amount based on your preferred thickness. Half-and-half makes it richer, while 2% milk works for a lighter option. Non-dairy alternatives like oat milk or almond milk work well for dairy-free versions.
Chocolate Syrup: That classic Hershey’s-style chocolate syrup is perfect here—it blends smoothly and provides authentic banana split flavor. You can substitute with chocolate sauce, but syrups incorporate more evenly.
Strawberry Syrup or Sauce: This adds the essential strawberry element of a banana split. Strawberry ice cream topping, strawberry preserves (strained), or even fresh strawberries blended in work beautifully as alternatives.
Whipped Cream: Homemade is always fantastic, but canned whipped cream is perfectly acceptable and much more convenient. It adds that classic ice cream parlor presentation.
Maraschino Cherries: The iconic finishing touch! These bright red cherries are non-negotiable for authentic banana split vibes. Save the cherry juice—a splash can be added to the shake for extra flavor.
Optional Toppings: Crushed peanuts, rainbow sprinkles, chocolate chips, or a drizzle of caramel sauce all make wonderful additions.
Equipment Needed
The beauty of this recipe lies in its simplicity. You don’t need fancy gadgets or specialized equipment—just a few basic kitchen tools that most home cooks already own.
- Blender: A standard countertop blender works perfectly. High-powered blenders like Vitamix or Ninja will give you an ultra-smooth result, but any blender capable of crushing ice will do the job.
- Measuring Cups: For portioning ice cream and milk accurately.
- Measuring Spoons: For syrups and any additional flavorings.
- Tall Milkshake Glasses or Mason Jars: Presentation matters! Classic soda fountain glasses, pint mason jars, or any tall glasses around 16 ounces work great.
- Long Spoons or Milkshake Straws: Wide paper or reusable straws make sipping easier. Long sundae spoons help you reach the bottom and scoop up any delicious bits.
- Rubber Spatula: Essential for scraping every last bit of milkshake from the blender—you won’t want to waste a drop!
- Ice Cream Scoop: Makes portioning ice cream easier and more consistent.
- Cutting Board and Knife: For slicing bananas.
Print

Banana Split Milkshake Recipe
This Banana Split Milkshake transforms the beloved classic American sundae into a thick, creamy, utterly delicious drinkable dessert. Featuring ripe bananas, vanilla ice cream, chocolate and strawberry syrups, and all the traditional toppings, it’s nostalgia in every sip. Ready in just 5 minutes!
- Total Time: 5 minutes
- Yield: 2 large milkshakes (approximately 16 oz each) 1x
Ingredients
ScaleFor the Milkshake Base:
- 2 medium ripe bananas (preferably frozen)
- 4 large scoops vanilla ice cream (about 2 cups)
- ¾ cup whole milk
- 2 tablespoons chocolate syrup, plus more for drizzling
- 2 tablespoons strawberry syrup or sauce
For Topping & Garnish:
- Whipped cream (generous amount)
- 2 maraschino cherries with stems
- Additional chocolate syrup for drizzling
- Additional strawberry syrup for drizzling
- 2 tablespoons crushed peanuts (optional)
- Rainbow sprinkles (optional)
Instructions
- Prepare the banana: If using fresh bananas, peel and break into chunks. For the thickest, frostiest results, use bananas that have been peeled, sliced, and frozen for at least 2 hours.
- Add base ingredients to blender: Place the banana chunks, vanilla ice cream, milk, chocolate syrup, and strawberry syrup into your blender jar.
- Blend until smooth: Blend on high speed for 30-45 seconds until completely smooth and creamy. Stop and scrape down the sides if needed. The consistency should be thick but pourable—add a splash more milk if too thick, or another scoop of ice cream if too thin.
- Prepare your glasses: While the milkshake blends, drizzle chocolate syrup in a spiral pattern inside each serving glass, followed by strawberry syrup. This creates a beautiful striped effect when you pour in the milkshake.
- Pour and serve: Divide the milkshake evenly between prepared glasses. Use a spatula to get every last drop from the blender.
- Add toppings: Top each milkshake generously with whipped cream, creating a tall swirl. Drizzle additional chocolate and strawberry syrups over the whipped cream. Sprinkle with crushed peanuts and/or rainbow sprinkles if using.
- Finish with cherries: Place a maraschino cherry with stem on top of each milkshake. Insert a wide straw and a long spoon.
- Serve immediately: Milkshakes are best enjoyed right away while still thick and frosty. Serve with extra napkins—things might get deliciously messy!
Notes
- For an extra-thick shake, freeze your banana chunks overnight and use ice cream straight from the freezer.
- Taste the milkshake before pouring and adjust sweetness by adding more syrup if desired.
- For a peanut butter banana split variation, add 2 tablespoons of creamy peanut butter to the blender.
- Make it boozy for adults by adding 1-2 oz of banana liqueur, Kahlúa, or rum.
- For a dairy-free version, use coconut milk ice cream and your preferred plant-based milk.
- Prep Time: 5 minutes
- Cook Time: 0 minutes
- Category: Beverage, Drink
- Method: Blender
- Cuisine: American
- Diet: Gluten Free
Nutrition
- Serving Size: 16 fl oz (1 large milkshake)
- Calories: 485
- Sugar: 62g
- Sodium: 165mg
- Fat: 16g
- Saturated Fat: 10g
- Unsaturated Fat: 5g
- Trans Fat: 0g
- Carbohydrates: 78g
- Fiber: 3g
- Protein: 8g
- Cholesterol: 58mg
Tips & Variations
One of the best things about this banana split milkshake is how easily you can customize it to suit different tastes and dietary needs. Here are some fun variations to try:
Chocolate Lover’s Version: Add a scoop of chocolate ice cream alongside the vanilla, plus an extra tablespoon of chocolate syrup. Top with chocolate shavings and mini chocolate chips.
Strawberry Forward: Blend in ¼ cup of fresh or frozen strawberries with the base ingredients. Use strawberry ice cream instead of vanilla for double strawberry goodness.
Peanut Butter Banana Split: Add 2-3 tablespoons of creamy peanut butter to the blender. Top with chopped peanuts and a peanut butter drizzle.
Tropical Twist: Add 2 tablespoons of pineapple juice or a few chunks of fresh pineapple—a nod to the original banana split’s pineapple topping.
Lighter Version: Use frozen banana as the primary base with just one scoop of ice cream, low-fat milk, and sugar-free syrups. Still delicious, significantly fewer calories.
Vegan/Dairy-Free: Substitute coconut or oat milk ice cream and your favorite plant-based milk. Use dairy-free whipped topping.
Malted Milkshake: Add 2 tablespoons of malted milk powder for that old-fashioned malt shop flavor.
Adult Version: For a boozy treat, blend in 1-2 ounces of banana liqueur, crème de cacao, Kahlúa, or spiced rum.
Pro Chef Tips
Want to take your banana split milkshake from great to absolutely extraordinary? These professional insights will help you achieve ice cream parlor perfection at home:
Chill your glasses: Place your serving glasses in the freezer for 15-20 minutes before preparing the milkshake. A frosty glass keeps your shake colder longer and adds to the authentic experience.
Temperature matters: The key to a perfect milkshake consistency is using frozen bananas but slightly softened ice cream. Let your ice cream sit at room temperature for 3-5 minutes before scooping—this helps it blend more smoothly and creates a creamier texture.
Layer your syrups strategically: When drizzling syrups inside the glass, use a squeeze bottle or steady hand to create consistent spirals. The chocolate and strawberry will create beautiful stripes as you pour in the milkshake.
Don’t over-blend: Blend just until smooth and combined, about 30-45 seconds. Over-blending incorporates too much air and can make your shake thin and frothy rather than thick and creamy.
Build the whipped cream properly: Hold the can straight up and start from the center, spiraling outward and upward. This creates that iconic tall swirl you see at professional ice cream shops.
Serve with style: Presentation elevates the experience. Use clear glasses to show off those syrup swirls, add colorful paper straws, and serve on a small plate with extra napkins.
Common Mistakes to Avoid
Even a simple recipe can go wrong if you’re not careful. Here are the most common pitfalls and how to sidestep them:
Using Unripe Bananas: Green or barely yellow bananas taste starchy and don’t have enough natural sweetness. Always use ripe bananas with brown spots for the best flavor. If your bananas aren’t ripe enough, you can speed up the process by placing them in a paper bag overnight.
Adding Too Much Milk: It’s tempting to add extra milk for easier blending, but this results in a thin, watery shake. Start with less milk than you think you need—you can always add more, but you can’t take it away. The shake should be thick enough to stand a spoon in.
Forgetting to Freeze the Banana: While you can use fresh bananas, frozen bananas create that thick, frosty texture that makes milkshakes so satisfying. Plan ahead and freeze your banana chunks for at least 2 hours, or keep a stash of frozen bananas ready for impromptu milkshake cravings.
Skipping the Glass Preparation: Decorating the inside of the glass with syrups before pouring takes an extra 30 seconds but dramatically improves both presentation and flavor distribution throughout the shake.
Waiting Too Long to Serve: Milkshakes begin separating and melting the moment they’re poured. Prepare your toppings in advance so you can garnish and serve immediately after blending.
Storage & Meal Prep
Let’s be honest—milkshakes are best enjoyed immediately. That thick, frosty perfection starts to deteriorate the moment it’s blended. However, life happens, and sometimes you need storage solutions.
Immediate Storage: If you need to step away for a few minutes, place the filled glasses in the freezer. This will keep them cold but may cause some thickening. A quick stir before serving helps restore the consistency.
Leftover Milkshake: Pour any leftover milkshake into an airtight container and freeze for up to 1 week. It won’t be the same creamy consistency when thawed, but it makes excellent milkshake popsicles! Pour into popsicle molds before freezing for a fun frozen treat.
Prepped Ingredients: For easy meal prep, portion your banana chunks into individual freezer bags. When craving strikes, just dump a bag into the blender with ice cream, milk, and syrups.
Batch Prep for Parties: If serving multiple people, you can blend a double or triple batch, pour into glasses, and hold in the freezer for up to 30 minutes before topping and serving. Add the whipped cream and garnishes right before serving.
Make-Ahead & Freezer Notes
While you can’t make the complete milkshake ahead of time, smart prep work makes last-minute assembly a breeze:
Freeze Bananas in Advance: Peel ripe bananas, slice into 1-inch chunks, and freeze in single-serving portions (about 1 banana per bag). They’ll keep for up to 3 months and are ready whenever you want a shake.
Pre-Measure Dry/Stable Ingredients: If making multiple milkshakes for an event, pre-measure your syrups into small containers. Having everything portioned and ready makes assembly lightning-fast.
Milkshake Freezer Packs: For ultimate convenience, combine frozen banana chunks with a measured amount of chocolate and strawberry syrup in freezer bags. When ready to serve, just dump the contents into a blender, add ice cream and milk, and blend.
Can You Freeze the Blended Milkshake?: Technically yes, but it won’t maintain that perfect milkshake texture. Frozen milkshake works better as a different dessert—pour into popsicle molds for banana split popsicles, or freeze in a shallow container and scrape for a granita-style treat.
Reheating Method: Milkshakes don’t get reheated! If frozen solid, let it thaw slightly at room temperature for 10-15 minutes, then re-blend with a splash of fresh milk to restore creaminess.
Serving Suggestions
While this banana split milkshake is absolutely perfect on its own, here are some delicious ways to serve it as part of a larger spread:
Classic Diner Style: Serve alongside a juicy cheeseburger and crispy french fries for the ultimate American comfort meal. The cold, sweet milkshake is the perfect counterpart to savory, salty foods.
Dessert Bar Setup: For parties, set up a milkshake bar with the base shake and various toppings. Let guests customize their own creations with different syrups, sprinkles, nuts, and candies.
Brunch Treat: Serve smaller portions as a fun, indulgent addition to weekend brunch alongside pancakes, waffles, or french toast.
Movie Night Companion: Pair with freshly popped popcorn and your favorite candy for the ultimate movie marathon experience.
Birthday Party Feature: Make it the star dessert at kids’ birthday parties. Serve in mason jars with colorful straws and let each child add their own toppings.
Summer Cookout Finale: After burgers and hot dogs, surprise your guests with banana split milkshakes as a refreshing, nostalgic dessert that requires no utensils.
Date Night In: Blend up two milkshakes and share them while watching a classic movie. Sometimes the simple pleasures are the most romantic.
FAQs
Can I make this milkshake without a blender? While a blender gives the best results, you can use an immersion blender in a deep container or even a food processor in a pinch. Some people have success with a large mason jar and vigorous shaking if using very ripe, mashed bananas and slightly melted ice cream, but the texture won’t be as smooth.
How can I make this milkshake thicker? Use frozen bananas instead of fresh, add an extra scoop of ice cream, reduce the amount of milk, or add a handful of ice cubes while blending. You can also freeze the milk into cubes and use those instead of liquid milk.
Can I use different ice cream flavors? Absolutely! While vanilla is traditional, you can use strawberry, chocolate, or even Neapolitan ice cream for a fun twist. Banana ice cream creates an intensely banana-flavored shake.
Is this recipe kid-friendly? Yes! Kids absolutely love this milkshake. For younger children, consider serving smaller portions in kid-sized cups and skipping the nuts (choking hazard) and using nut-free toppings instead.
How do I make a dairy-free version? Substitute the vanilla ice cream with your favorite dairy-free alternative (coconut, almond, or oat-based work well). Use plant-based milk and check that your syrups are dairy-free (most are). Top with coconut whipped cream.
Can I reduce the sugar content? Yes! Use sugar-free syrups, choose a lower-sugar ice cream or frozen yogurt, and let the ripe banana provide most of the sweetness. The riper the banana, the sweeter your shake will be naturally.
Why is my milkshake too thin/runny? You likely added too much milk or your ice cream was too soft. Fix it by adding more ice cream or a handful of ice cubes and blending briefly. Next time, use frozen bananas and ice cream straight from the freezer.
Conclusion
There you have it—the ultimate Banana Split Milkshake that brings all the magic of a classic American ice cream parlor right into your kitchen. This recipe proves that sometimes the best desserts are the simplest ones, combining familiar flavors in a way that feels both nostalgic and exciting.
Whether you’re making these for a summer celebration, treating your family on a lazy Sunday afternoon, or simply satisfying a late-night craving, this milkshake delivers pure happiness in every single sip. The combination of sweet ripe bananas, creamy vanilla ice cream, and those signature chocolate and strawberry syrups—all topped with fluffy whipped cream and a cherry—is nothing short of magical.
I hope this recipe becomes a beloved favorite in your home, just as it has in mine. There’s something incredibly special about watching faces light up when you hand over one of these beautifully decorated, over-the-top milkshakes. It’s not just a dessert; it’s a memory in the making.
Now it’s your turn to give this recipe a try! I’d absolutely love to hear how your banana split milkshakes turn out. Did you add any special variations? Discover a new favorite topping combination? Drop a comment below and share your experience—your tips might inspire other home cooks in our community.
And if this recipe brought a smile to your face, please share it on Pinterest so others can discover the joy of homemade banana split milkshakes too. Happy blending, friends! 🍌🍫🍓