Homemade Java Chip Frappuccino Recipe: Café-Quality Iced Coffee at Home
There’s nothing quite like that first sip of a cold, creamy Java Chip Frappuccino on a warm afternoon. This iconic blended coffee drink has become a staple at coffee shops across America, but here’s the exciting part: you can absolutely make this coffee shop favorite in your own kitchen! Our homemade Java Chip Frappuccino recipe delivers that perfect balance of rich espresso, smooth vanilla, and those signature chocolate chips that make this drink so craveable and satisfying.
Whether you’re looking to save money on your daily coffee shop runs, want to customize the sweetness to your liking, or simply enjoy experimenting with beverages in your home kitchen, this recipe is going to become your new best friend. It’s perfect for hot summer mornings, afternoon pick-me-ups, after-dinner treats, or even as a fun beverage option when you’re entertaining guests. The best part? You can have this delicious drink ready in just five minutes, making it perfect for busy mornings or spontaneous cravings.
The Rich History Behind Your Favorite Blended Coffee Drink
The Java Chip Frappuccino has an interesting backstory that many coffee lovers don’t know. The drink was first introduced by Starbucks in 1995, during a time when blended coffee drinks were still relatively new and innovative in the commercial coffee world. The term “frappuccino” is actually a portmanteau created by Starbucks, combining “frappe” (a blended iced coffee drink with roots in New England) and “cappuccino” (the classic Italian espresso drink).
The name “Java” in Java Chip refers to java, which is slang for coffee that originated from the Indonesian island of Java, a historically significant coffee-producing region. The addition of chocolate chips to create the “chip” component made the drink an instant favorite because it added texture, visual appeal, and an extra touch of indulgence that resonated with American consumers who were developing an increasingly sophisticated coffee palate.
Over the past three decades, the Java Chip Frappuccino has evolved from a trendy novelty drink into a cultural icon. It’s been featured in countless TikTok videos, Instagram posts, and coffee enthusiast discussions online. The drink’s popularity speaks to American coffee culture’s love affair with customization, indulgence, and that perfect afternoon caffeine boost. By learning to make this at home, you’re tapping into a tradition that millions of Americans enjoy every single day.
Why You’ll Absolutely Love Making This Recipe at Home
Creating your own Java Chip Frappuccino at home is genuinely one of the best decisions you can make for your coffee routine, and here’s why:
The beauty of this homemade version is that you’re in complete control. You get to decide exactly how much sweetness you want, the strength of your coffee, the creaminess factor, and whether you want extra chocolate chips or not. Store-bought frappuccinos often come with a predetermined flavor profile that might be too sweet for some palates or not quite rich enough for others.
Key benefits of making this recipe:
- Budget-Friendly Magic – A single Starbucks Java Chip Frappuccino runs between $5–$7 depending on your location, while making this at home costs you roughly $1–$1.50 per serving. Over a month of daily consumption, that’s approximately $100–$150 in savings. This isn’t just a recipe; it’s your personal coffee shop that pays for itself.
- Takes Only Minutes to Prepare – From opening your freezer to taking that first delicious sip, this entire process takes about five minutes. It’s faster than driving to a coffee shop, waiting in line, and dealing with traffic.
- Family-Friendly and Customizable – Kids love helping make these, and you can easily adjust the coffee intensity for different family members. Your health-conscious family member wants less sugar? Adjust it. Your cousin loves extra chocolatey goodness? Make their version with doubled chocolate chips.
- Perfectly Consistent Results – Once you make this a few times, you’ll get the exact texture and taste profile you’re craving every single time. Coffee shop drinks can vary based on who’s making them; your homemade version is consistently excellent.
- Great for Entertaining – Impress guests with homemade frappuccinos that taste like they came from a professional café. People always ask how you made something this delicious at home, and you get to share your secret recipe.
- Control Over Ingredients – You know exactly what’s going into your drink. No mysterious syrups or additives unless you choose to add them. If you prefer organic milk or fair-trade coffee, you can use exactly those products.
Understanding Your Key Ingredients and Why They Matter
Creating the perfect Java Chip Frappuccino starts with understanding what makes each ingredient essential. Let me walk you through the component parts of this drink:
Strong Brewed Coffee or Espresso – This is the foundation of your frappuccino. You need coffee that’s bold and flavorful because it needs to shine through the milk, ice, and chocolate. If your coffee is weak, your entire drink will taste watered down. I recommend using espresso shots for the most authentic café experience, or strong brewed coffee if you don’t have an espresso machine. Make sure to brew your coffee and let it cool completely before using it; warm coffee will melt your ice and create a watery texture.
Substitution option: If you don’t have strong coffee available, you can use cold brew concentrate from the store. It’s convenient and delivers that rich coffee flavor.
Whole Milk or Alternative – Whole milk creates that creamy, luxurious texture that makes this drink feel indulgent. The fat content in whole milk is crucial for mouthfeel and helps distribute flavors evenly. If you prefer lighter options, use 2% milk or a combination of milk and half-and-half for extra richness.
Substitution options: Oat milk creates a wonderful creamy texture and has become increasingly popular for frothed beverages. Almond milk works fine but is thinner. Coconut milk adds tropical notes. Cashew milk is naturally creamy and delicious.
Vanilla Syrup or Vanilla Extract – This adds sweetness and that subtle vanilla undertone that makes store-bought frappuccinos so addictive. You can use commercial vanilla syrup, homemade vanilla simple syrup, or even a splash of vanilla extract mixed with a touch of sugar. The vanilla doesn’t overpower the coffee; it creates a smooth flavor bridge between the espresso and chocolate.
Substitution options: Hazelnut syrup creates a different vibe. Caramel syrup adds deeper sweetness. Almond extract offers a more sophisticated flavor profile.
Semi-Sweet Chocolate Chips – These are non-negotiable for authenticity. Semi-sweet chips have the perfect balance of cocoa and sugar. They add texture through the drink, and as they slightly melt and blend, they create pockets of chocolate flavor throughout. Use quality chocolate chips if possible; they make a noticeable difference.
Substitution options: Dark chocolate chips create a more sophisticated, less sweet version. Milk chocolate chips are sweeter and more candy-like. White chocolate chips create an entirely different flavor profile that some people absolutely love.
Ice – This might seem obvious, but quality matters. Use fresh ice; old ice from the back of your freezer can taste stale. Crushed ice blends more smoothly than large ice cubes, creating a better texture.
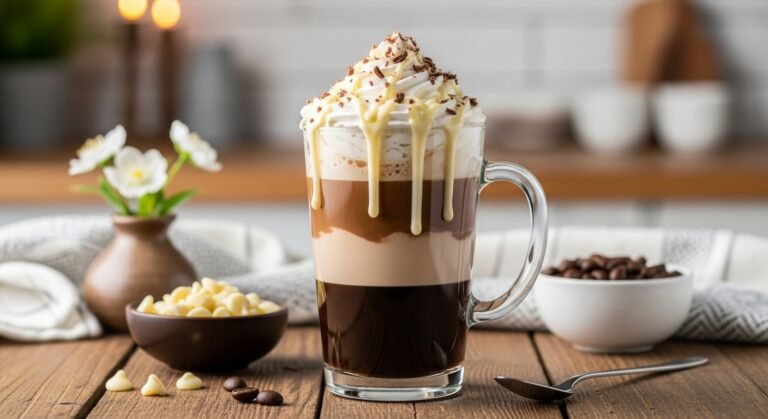
Optional Add-ins – Whipped cream on top adds cafe authenticity and richness. A tiny drizzle of chocolate syrup on the inside of your glass creates a visual treat and additional chocolate flavor. A pinch of sea salt on the whipped cream creates a sophisticated sweet-salty contrast.
Equipment You’ll Need for Success
Having the right tools makes this process smooth and enjoyable. Here’s what you should gather before you start:
Blender – This is your MVP. A high-powered blender like a Vitamix or Ninja creates the smoothest texture, but a standard blender works perfectly fine. The key is that it needs to handle ice well and blend everything into that signature creamy-smooth texture.
Measuring Cups – You’ll want accurate measurements for the milk and coffee components. Liquid measuring cups work best for this recipe.
Tablespoon or Teaspoon Measures – For measuring your vanilla syrup and chocolate chips.
Tall Glasses – Frappuccinos are best served in tall glasses that showcase the beautiful blended texture. Use glasses that can handle cold temperatures without cracking.
Spoon or Straw – The texture of a frappuccino is thick enough to eat with a spoon, and many people enjoy using both a spoon and a straw.
Optional: Whipped Cream Dispenser – If you want to top your drink with homemade whipped cream, a whipped cream dispenser or even a regular whisk and bowl works great.
Print
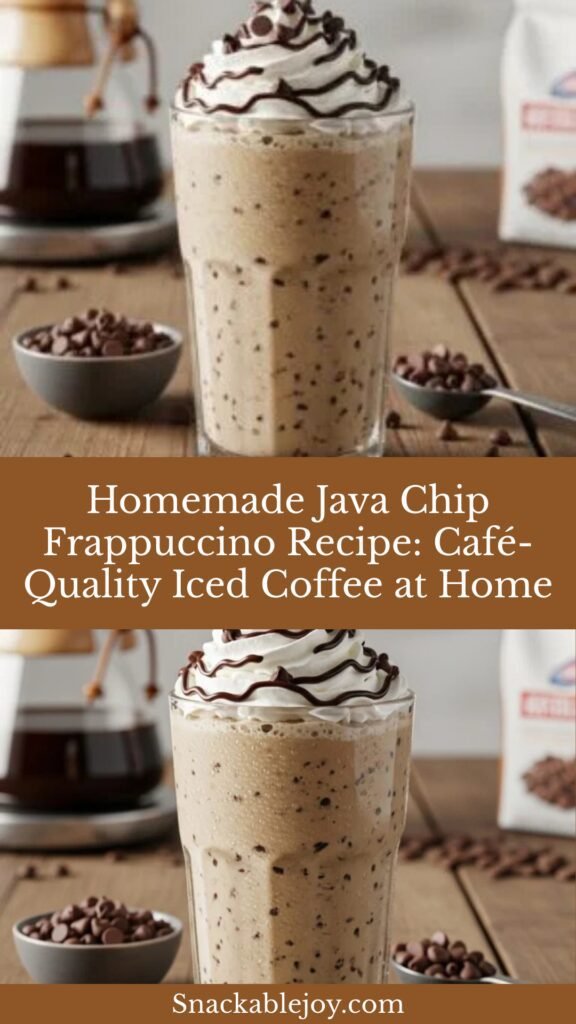
Java Chip Frappuccino Recipe
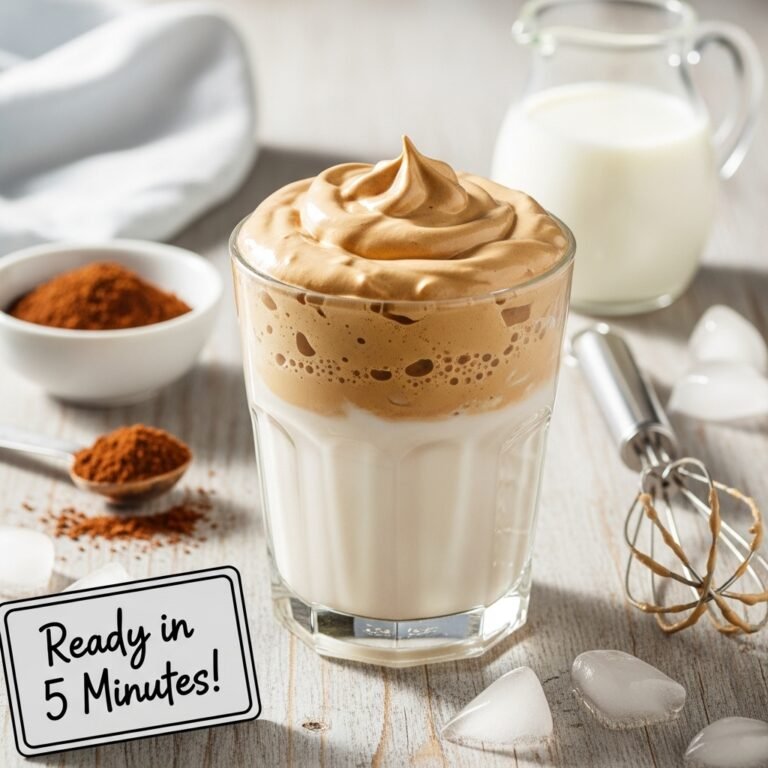
This creamy, indulgent homemade Java Chip Frappuccino rivals any coffee shop version. Packed with rich espresso, smooth vanilla, and chocolatey goodness, this blended iced coffee drink is perfect for hot days, afternoon pick-me-ups, or treating yourself to a café-quality beverage without leaving home. Takes just five minutes to prepare and is completely customizable to your taste preferences.
- Total Time: 5 minutes
- Yield: 2 servings (about 12 ounces each) 1x
Ingredients
- 1 cup strong brewed espresso or cold brew coffee (cooled to room temperature or completely chilled)
- 1 cup whole milk (or milk of your choice)
- 2–3 tablespoons vanilla syrup (store-bought or homemade)
- ½ cup semi-sweet chocolate chips
- 1½ cups ice cubes (crushed if possible)
- 1–2 tablespoons whipped cream (optional, for topping)
- ½ teaspoon vanilla extract (optional, for extra vanilla flavor)
- Chocolate syrup drizzle (optional, for garnish)
- Pinch of sea salt (optional, for topping whipped cream)
Instructions
Step 1: Gather Your Cold Coffee – If you just brewed your espresso or coffee, allow it to cool completely. Hot coffee will melt your ice and create a watery drink. The best approach is to brew your coffee 15–30 minutes ahead of time, or use cold brew concentrate if you have it on hand. Cold coffee is your secret to the perfect texture.
Step 2: Add Base Ingredients to Blender – Pour your cooled coffee into your blender first, followed by the milk. The order matters slightly because you want liquid at the bottom to help blend the ice smoothly. Add your vanilla syrup at this point.
Step 3: Add Chocolate Chips – Distribute the chocolate chips evenly over the liquid mixture. Don’t dump them all in one spot; spreading them helps them blend more evenly into your drink.
Step 4: Top with Ice – Add your ice cubes to the blender. If you’re using crushed ice, you’ll need slightly less. If you’re using standard ice cubes, you might need an extra handful.
Step 5: Blend Until Smooth – Blend on high speed for 45–60 seconds, until everything is completely smooth and creamy. You should see no visible ice chunks. Stop and check the consistency; it should be thick and creamy, like soft-serve ice cream consistency. If it’s too thin, add more ice and blend again. If it’s too thick, add a splash more milk.
Step 6: Pour and Serve Immediately – Divide between two tall glasses. The drink will start separating if it sits, so serve it right away for the best experience.
Step 7: Top with Whipped Cream (Optional but Recommended) – Add a generous dollop of whipped cream to the top of each drink. Drizzle with chocolate syrup and sprinkle with sea salt if desired. This creates that authentic café presentation.
Step 8: Enjoy – Insert a wide straw and grab a spoon. The texture is thick enough to eat, and many people enjoy the spoon-and-straw combination.
Notes
- Make it less sweet: Reduce vanilla syrup to 1 tablespoon and use dark chocolate chips instead of semi-sweet.
- Make it dairy-free: Use your favorite plant-based milk and coconut cream instead of whipped cream topping.
- Extra strong coffee flavor: Use 1¼ cups espresso instead of 1 cup for a bolder coffee taste.
- For a thicker consistency: Add another ¼ cup chocolate chips or use frozen coffee cubes instead of regular ice.
- Protein boost: Add 1–2 tablespoons chocolate protein powder for extra nutrition and creaminess.
- Make it ahead slightly: Brew your coffee and store it in the refrigerator up to 24 hours before making your drink.
- Prep Time: 5 minutes
- Cook Time: 0 minutes
- Category: Beverages / Desserts
- Method: Blender
- Cuisine: American
- Diet: Gluten Free
Nutrition
- Serving Size: 1 beverage (about 12 oz)
- Calories: 285
- Sugar: 35g
- Sodium: 95mg
- Fat: 11g
- Saturated Fat: 6g
- Unsaturated Fat: 5g
- Trans Fat: 0g
- Carbohydrates: 38g
- Fiber: 1g
- Protein: 7g
- Cholesterol: 25mg
Tips & Creative Variations to Customize Your Drink
One of the best parts about making this drink at home is that you can customize it endlessly. Here are some delicious variations to try:
The Protein-Packed Version – Add a scoop of vanilla protein powder to boost the nutritional profile and add creaminess. This version is perfect if you’re having this as a post-workout treat or meal replacement smoothie. The protein powder creates an even thicker, more satisfying texture.
The Dark Chocolate Lover’s Version – Swap semi-sweet chocolate chips for dark chocolate chips and add a tablespoon of unsweetened cocoa powder to the blender. This creates a more sophisticated, less sweet version that true chocolate enthusiasts will love.
The Caramel Dream Variation – Replace vanilla syrup with caramel syrup and add a tablespoon of salted caramel sauce to the inside of your glass before blending. Top with whipped cream and a caramel drizzle. This version tastes like liquid caramel candy.
The Hazelnut Twist – Use hazelnut syrup instead of vanilla syrup, and top with crushed hazelnuts. This creates a more gourmet, European-inspired flavor profile.
The Mocha Masterpiece – Add a tablespoon of unsweetened cocoa powder and an extra shot of espresso to create a drink that’s half frappuccino, half mocha. This is perfect for chocolate and coffee lovers who can’t choose between the two.
The Tropical Escape – Use coconut milk, add a splash of pineapple juice, and replace chocolate chips with toasted coconut flakes. This variation is unexpected and absolutely delicious.
The Sugar-Free Smart Version – Use sugar-free vanilla syrup and monk fruit sweetener or erythritol to reduce sugar content significantly. Use dark chocolate chips or sugar-free chocolate chips. This version satisfies cravings while being more diet-conscious.
The Spiced Chai Java – Add half a teaspoon of chai spice or pumpkin pie spice to create a seasonal version. This works especially well in fall and early winter.
The Adults-Only Boozy Version – Add a tablespoon of coffee liqueur, Irish cream, or dark rum for an indulgent adult beverage. Perfect for dessert after dinner or brunch entertaining.
Pro Chef Tips for Café-Quality Results
These insider tips come from professional baristas and coffee shop owners who make these drinks daily. Implementing even a few of these will elevate your home frappuccino game significantly:
Tip 1: Use Espresso Shots for Maximum Flavor – If you have access to an espresso machine or even a Moka pot, use real espresso shots instead of brewed coffee. Espresso has a more concentrated flavor that stands up better to the milk and ice. If you don’t have an espresso machine, use cold brew concentrate, which also provides intense coffee flavor.
Tip 2: Pre-Chill Your Glasses – Place your serving glasses in the freezer for 5 minutes before pouring your frappuccino. This keeps your drink colder longer and prevents the ice from melting as quickly, maintaining that perfect creamy texture throughout your drinking experience.
Tip 3: Blend in Two Stages – First, blend just the liquid ingredients together (coffee, milk, and syrup) for about 10 seconds. Then add your ice and chocolate chips and blend again. This two-stage approach creates a smoother, more evenly textured drink.
Tip 4: Use High-Quality Chocolate – The chocolate chips are a starring ingredient, so invest in good ones. Ghirardelli, Lindt, or even Trader Joe’s brand chocolate chips are noticeably better than generic supermarket brands and make a real difference in flavor.
Tip 5: Toast Your Chocolate Chips – For an extra touch of sophistication, lightly toast your chocolate chips in a dry skillet over medium-low heat for 1–2 minutes before adding them to the blender. This brings out deeper chocolate notes and creates a more complex flavor profile.
Tip 6: Make Coffee Ice Cubes – Instead of using regular ice, freeze strong coffee in ice cube trays. When these melt, they dilute your drink with more coffee flavor rather than water, maintaining that rich taste throughout.
Tip 7: Taste and Adjust – After blending, take a small taste before serving. If you want it sweeter, add a tiny bit more syrup and pulse. If you want it stronger, add a splash more espresso. This final adjustment step is what separates good homemade drinks from excellent ones.
Tip 8: Don’t Over-Blend – Blending too long heats up the mixture and creates a slightly separated, less creamy texture. Blend just until smooth, then stop. You want that beautiful creamy consistency, not a heated semi-liquid.
Common Mistakes to Avoid
Even with a great recipe, small errors can affect your final drink. Here’s what to watch out for:
Mistake 1: Using Warm Coffee – This is the most common error. Warm or even room-temperature coffee will melt your ice, creating a watery drink. Always use completely cooled or chilled coffee. If you’re in a hurry, brew your coffee in advance and refrigerate it, or use store-bought cold brew.
Mistake 2: Not Using Enough Ice – A frappuccino should be thick and creamy, almost like soft-serve ice cream. If your drink is too thin and pourable, you didn’t use enough ice. Start with 1½ cups and adjust based on your blender’s power and your texture preference.
Mistake 3: Using Low-Quality or Old Blender – A weak blender struggles with ice and creates a grainy, separated texture. If your blender isn’t handling the ice well, you might need to crush the ice first with a mallet or in a food processor before adding it to the blender.
Mistake 4: Skipping the Vanilla Syrup – It might seem like an optional ingredient, but vanilla syrup is actually essential to authenticity. It creates the smooth flavor bridge between espresso and chocolate. Don’t skip it or reduce it too much.
Mistake 5: Making Too Much at Once – This drink is best consumed immediately after blending. Don’t try to make a huge batch and store it; the texture will separate and become watery. Make one or two servings at a time for the best experience.
Storage, Make-Ahead, and Meal Prep Information
Immediate Storage: Frappuccinos are best consumed immediately after blending. They start separating within 10–15 minutes, and the ice melts, creating a thinner, less appealing texture.
Storing Components: You can prep components ahead of time for quick assembly:
- Brew and cool your coffee up to 24 hours ahead and store in the refrigerator
- Measure out your milk and syrup into containers the night before
- Pre-portion chocolate chips into small containers
Freezing Coffee for Later: Brew your coffee and pour it into ice cube trays. Once frozen, transfer the cubes to a freezer bag where they’ll keep for up to 3 months. These coffee ice cubes are actually ideal for making frappuccinos because they don’t dilute your drink as it melts.
Can You Make This Ahead? Not really. This drink is best made fresh. However, you can have all your ingredients prepped and ready to go, which makes assembly lightning-fast.
Storing Leftover Drink: If you accidentally made too much or have leftovers, cover and refrigerate up to 2 hours. The texture will have separated, but you can re-blend it briefly with a splash of milk to restore some creaminess.
Make-Ahead and Freezer Notes
Prep Work You Can Do: On Sunday evening, you could spend 10 minutes prepping your week’s frappuccino ingredients. Brew a large batch of cold brew concentrate, portion out chocolate chips, and measure your syrup. Each morning, you’re just blending, which takes five minutes.
Freezer-Friendly Tip: Make coffee ice cubes (as mentioned above) and store them for up to 3 months. This is genuinely the best hack because your frappuccino maintains flavor as it melts instead of becoming diluted with water ice.
Best Assembly Method: If you’re prepping for a busy morning, the night before, brew your coffee and let it chill completely. In the morning, add chilled coffee, milk, syrup, chocolate chips, and ice to the blender. Blend and enjoy. This “assembly-line” approach takes about five minutes total.
Batch Making for Parties: If you’re entertaining, you can blend one or two servings at a time rather than trying to make four servings in one blender. This actually produces better quality drinks because each batch gets properly blended.
Serving Suggestions and Pairings
While frappuccinos are delicious on their own, pairing them with complementary foods elevates the experience:
Perfect Breakfast Pairings: Serve alongside a buttery croissant, a chocolate croissant (pain au chocolat), a blueberry muffin, or French toast. The creamy sweetness of the frappuccino complements baked goods beautifully.
Afternoon Snack Companions: Pair with biscotti, chocolate chip cookies, brownies, or churros for dunking. The rich drink makes an excellent beverage while enjoying a sweet snack.
Dessert Course: Serve after dinner instead of or alongside dessert. Many people enjoy this as a lighter alternative to traditional desserts.
Brunch Menu Addition: Include frappuccinos in your brunch spread alongside mimosas, coffee, and pastries. Guests love the homemade touch.
Summer BBQ Option: On hot days when you’re grilling, offering homemade frappuccinos as a cold beverage option is impressive and refreshing.
After-Dinner Treat: Serve in smaller portions as a digestif-style beverage after a meal. The coffee aids digestion, and the chocolate adds a sweet note.
Frequently Asked Questions
Q: Can I make this without an espresso machine or Moka pot? A: Absolutely! Use strong brewed coffee or cold brew concentrate instead. The key is using coffee that’s bold and flavorful so it comes through in the final drink.
Q: Is this drink vegan? A: The base recipe isn’t vegan because of the milk, but you can easily veganize it by using plant-based milk and skipping the whipped cream topping (or using coconut whipped cream).
Q: Why does my frappuccino taste watery? A: The most common reason is using warm coffee that melted your ice, or not using enough ice in the first place. Always use completely cooled coffee and aim for a thick, soft-serve consistency.
Q: Can I use instant coffee instead? A: You can, but it won’t taste as good as fresh brewed coffee or espresso. If you must use instant, dissolve 2–3 tablespoons of instant espresso powder in 2 tablespoons of hot water, then let it cool completely before adding to the blender.
Q: How can I make this less sweet? A: Use less vanilla syrup (start with 1 tablespoon instead of 2–3), use dark chocolate chips instead of semi-sweet, and skip the whipped cream topping.
Q: Can I add protein powder? A: Yes! Add 1–2 tablespoons of vanilla or chocolate protein powder. This increases nutrition and creates an even creamier texture.
Q: Does this need to be made with a high-powered blender? A: A standard blender works fine, though high-powered blenders like Vitamix or Ninja create a silkier texture more quickly. Whatever blender you have will work; it might just take an extra 10–20 seconds of blending.
Q: How many calories are in this drink? A: Based on our recipe card, approximately 285 calories per serving for two servings. This varies based on your specific ingredients and whether you add whipped cream.
Final Thoughts and Warm Call to Action
Making your own Java Chip Frappuccino at home is one of those simple pleasures that pays dividends immediately. That first time you blend up this creamy, chocolatey, coffee-filled drink in your own kitchen and realize it tastes just like the coffee shop version—but cost you a fraction of the price and took five minutes—you’ll feel genuinely proud of yourself.
Beyond the practical benefits of saving money and time, there’s something special about creating café-quality beverages at home. It’s a small act of self-care, a moment of indulgence in your day, and a delicious reminder that you don’t need to spend $6 at a coffee shop to treat yourself well.
I absolutely encourage you to try this recipe this week. Make it on a hot afternoon, share it with your family, or surprise a friend with a homemade frappuccino. Notice how much better it tastes when you’ve made it with your own hands using ingredients you chose.
Drop a comment below and let me know:
- Did you make this recipe? How did it turn out?
- What variation did you try?
- Would you like more homemade coffee drink recipes?
Save this recipe to your Pinterest board so you have it ready whenever the craving strikes. Share it with your coffee-loving friends and family—I promise they’ll be impressed!
Happy blending, and enjoy every single sip of your homemade Java Chip Frappuccino! ☕✨